


Guides For Users and Administrators
Using KeepTrack
Answers to questions concerning everyday use of KeepTrack
Send emails from Dashboard
These emails are sent as HTML mails in your branding. To use these you need a VIP email subscription; see below.
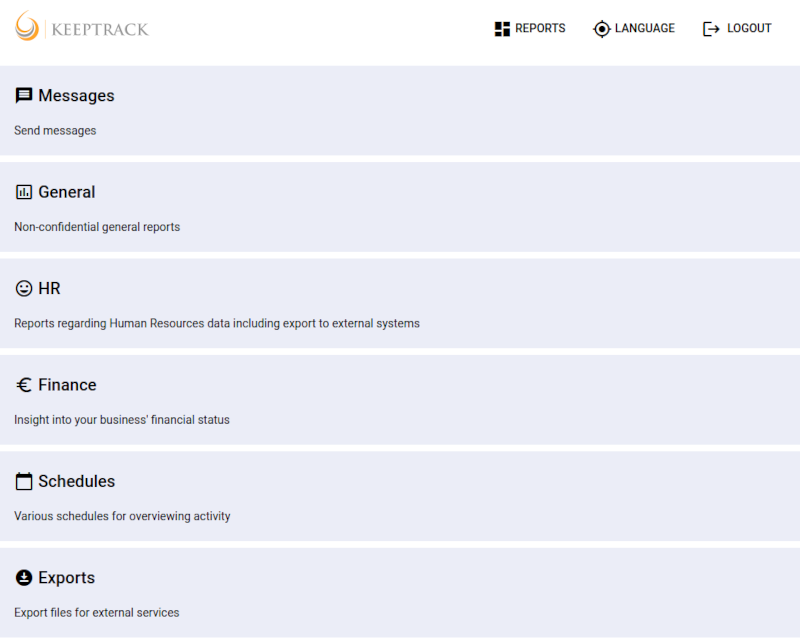
Under 'Reports' 'Messages' you will find the cards to send different emails.
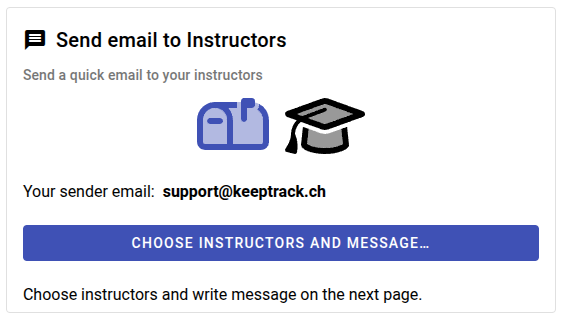
Send to your instructors.
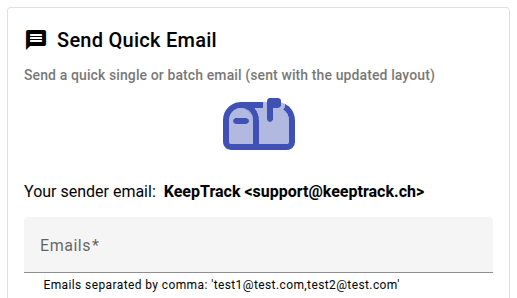
Send a quick email to any address.
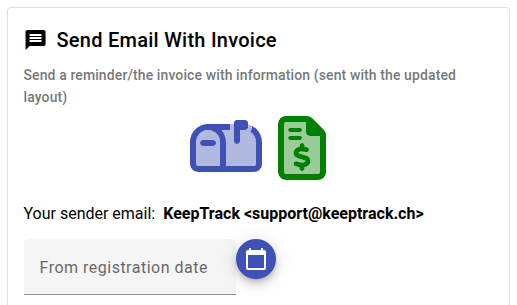
Send invoices/reminders to your customers.
Please find more information on the respective card.
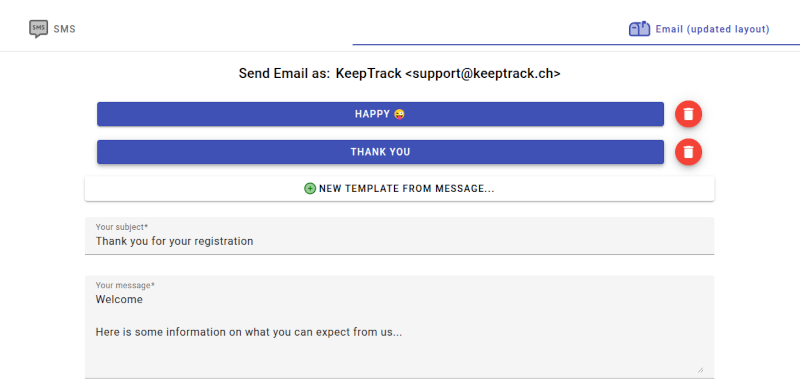
So how does this work?
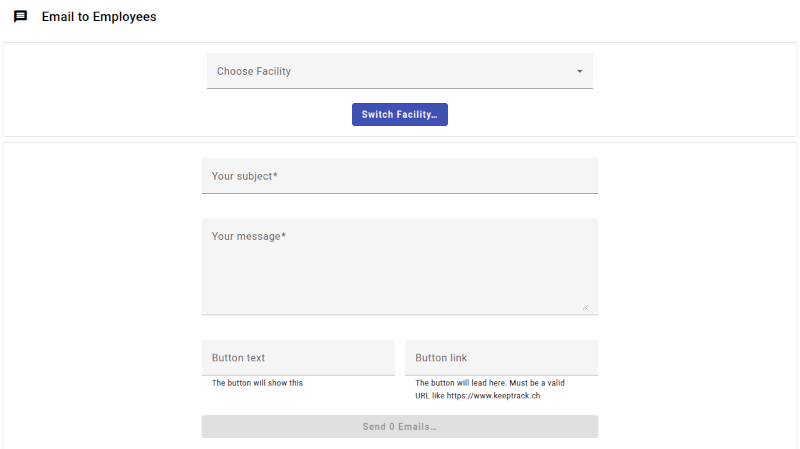
- Fill in the email subject (does not take emoji)
- Fill in the body text (linebreaks, emoji, and URL/web-links are automatically shown as such - Does not take formatting)
- Leave the button fields blank to leave out the button
- Fill in button text AND URL/web-link to show the active button
- Add PDF file when relevant (under 'Admin Tools')
Templates in admin tool and invoices
- Email under Admin Tools, and Reports -> Messages -> 'Send Email With Invoice' now have templates
- Make your own templates for subject and body text
- Just click the template button to fill in the content
- You can have up to 5 templates
- Templates are shared between email tools
What is sent/received?
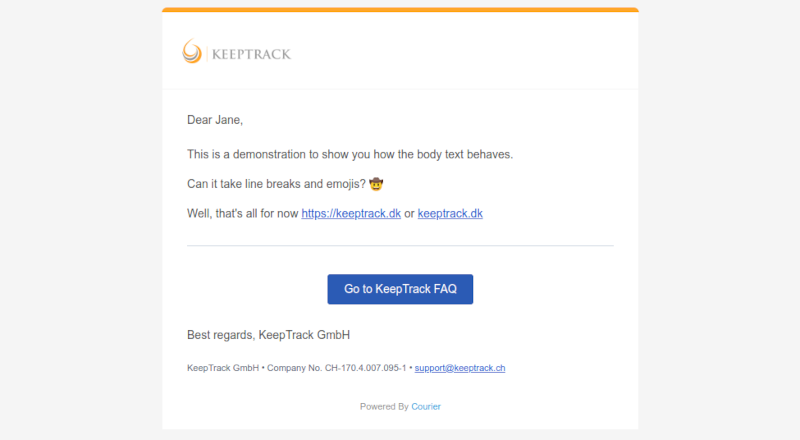
- Top bar in your color
- Your logo
- "Dear Jane" will automatically show with the recipients first name
- The body text from the form
- The button is automatically left out or shown according to your choice in the form
- "Best regards" will automatically show your company name
- The footer will automatically show your company details
- Note: The email will be in your primary language, but you can of course set any body text you wish
This is a paid service
Please note that this is an opt-in service. Just contact Support to let us know you want in.
We invoice up front and automatically adjust use the following month.
Costs to initiate the service
- Development cost: €0
- Setup cost: €0
- Your logo: €0
- Your colour in the top bar: €0
- Pure text emails (current service): €0
Email tiers invoiced per month in advance (see below for currency adjusted pricing)
- Up to 1.000 emails/month: €10
- Up to 10.000 emails/month: €90
- Up to 20.000 emails/month: €160
- Over 20.000 emails/month: contact us
Pricing (approximate, your company location, per 2025-06)
- DKK 75, 675, 1.200 respectively
- € 10, 90, 160 respectively
- £ 9, 76, 135 respectively
- NOK 115, 1.050, 1.850 respectively
- € 10, 90, 160 respectively
- SEK 110, 990, 1.800 respectively
- $ 11, 100, 175 respectively
Contact us if you plan to send over 20.000 emails per month
When you are in need of numbers for things like turn-over and periodization, you primarily use the Dashboard reports under 'Finance'
Here we show you how to find turnover and periodization amounts: "At the end of the financial year, periodization needs to be made so that income ends up in periods in which they have been earned".
Note: Your accountant knows if and how to use this method.
Example: 'Last year' = 2022. 'This year' = 2023
Turn-over
Turn-over for last year

- Select 'Activity Start Date' which shows turnover on all activities starting during the range selected below regardless of payment date.
- Select January 1st of last year as 'From date'
- Select December 31st of last year as 'To date'
- This is your total turnover for last year
Periodization
Find the amount paid last year for this years activities

- Select 'Activity Start date' which shows payments on all activities starting during the range selected below regardless of payment date.
- Select January 1st of this year as 'From date'
- Select December 31st of this year as 'To date'
- This gives you the payments for the this year regardless of whether it is paid this year or last year
- Open the report and download the Excel file
- Open the Excel file
- Sort the file after 'payment_date'
- Delete all rows with 'payment_date' this year
- Sum the column 'payment'
- You now have the amount paid last year for this years activities

The marked row gives you a total amount of 500 in this example. Real data will most likely give you many rows to add up.
If this feels complicated, we recommend that you pull the reports and then give these and this description to your accountant.
Also note that if you pull this data very late 'this year', or even the year(s) after 'this year', you will need to also take payments from previous years into consideration. In the above example: You will now most likely have payments from both 2022 (early payments) and 2024 (late payments) for activities during 2023.
Handle your rejected payments from QuickPay
When your customers pay online via your QuickPay account there will inevitably be rejected payments for you to handle manually. These payments are already registered in KeepTrack as we received a confirmation from QuickPay at the time of registration, but the acquirer/the bank can still reject the payment in arrears - Up to 6 months later.
You have to handle these rejections manually, but there should only be between 1-6% rejected of your total payments (data from one of our customers backed up by our own data).
Use the 'Rejected Payments' tool in your Dashboard
You will find this interactive tool on the front page of your Dashboard as seen here.

When you hover the button you get a status message on the last rejection: Today, yesterday or before yesterday. Before yesterday is indicated by a black icon.
If the last rejected payment was yesterday or today you will get a visual indication. (Please note that this updates on every load of the frontpage, which should be sufficient. Ie if you have the page open it will not update, but if you switch to one of the tools or reports and go back - by clicking on the upper left KeepTrack logo - the data will refresh.)

Latest rejection today indicated by a red icon

Latest rejection yesterday indicated by an orange icon
This should ease your handling of these rejections as you do not need to open the tool until there is a new rejection. And you do not need to open your QuickPay account at all for this.
Open the 'Rejected Payments' tool
When you open the tool you will see something like this

The top row is the latest payment
Where indicated by the orange box there will be a link directly to the payer in question in your super-user account. As this is a new feature we have not been able to show it yet. There should soon be information available on this specific topic.
Why is this not fully automated?
For several reasons
- There are often discrepancies between the original, paid amount and the returned amount on the rejection. The service provider and the acquirer takes a fee
- The rejection can be done up to 6 months after the payment which might affect your bookkeeping
- We are certain you want to handle this personally with your customer which means you need to handle the rejection anyway
- The rejections are relatively few
- …
Send text messages to your customers
You will find the 'Send messages' tool in your Dashboard as a trusted or admin user. This tool is very powerful for sending important messages to your customers.
Note that you can simply start typing and search for the relevant facility or instructor.
With a staff account, or higher, you can quickly and easily send SMS to external numbers and to your instructors via the Dashboard Reports under 'Messages'.
When you send from the 'Send Quick SMS' tool under reports please be aware that you need to add/adjust the country code. This is done so you can text individuals outside of your own region. You can text these country codes: 33(FR), 34(ES), 44(GB), 45(DK), 46(SE), 47(NO), 49(DE).

Get an unlimited SMS account
Please note that we include a limited number of SMS in the standard service. If you want an unlimited account we can facilitate that at a very competitive price.
We invoice in arrears at roughly €0.070 per SMS (please contact us for the exact price in your national network and to order an unlimited account).
Standard service
- Up to ca 600 messages per 30 days (depending on your service tier). After that the account is automatically blocked for up to 30 days
- Ca 400 of these per day. After that the account is automatically blocked for up to 24 hours
- Standard tools included
- No additional cost
Unlimited account
- Unlimited messages per month
- Unlimited messages per day
- You only pay for what you use
- Invoice in arrears
- Standard tools included
- SMS templates included
- Scheduled SMS included
- Detailed overview of your use directly in the Dashboard 'Key Figures'
Pricing (your company location, per 2025-01)
- DKK 0,45 per SMS
- € 0,072 per SMS
- € 0,08 per SMS
- £ 0,042 per SMS
- NOK 0,80 per SMS
- € 0,07 per SMS
- SEK 0,75 per SMS
- $ 0,01 per SMS
Contact us if you plan to send over 10.000 SMS per month
Unlimited accounts
When you are on a paid unlimited account you further get templates to ease your writing, and scheduling in order to prepare your important messages ahead of time.
For the sake of your customers, scheduled messages are sent between 08:00 and 20:00 according to your individual scheduling.

Save a new template
When you save your templates you simply enter the desired text in the 'Your message' field and click 'NEW TEMPLATE FROM MESSAGE...'.
Use a template
Simply click one of the template buttons and the text is inserted into the 'Your message' field.
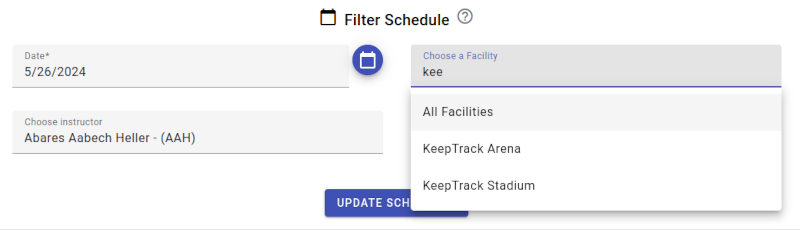
Schedule an SMS
Choose the date and time as indicated above. You can schedule messages 60 days into the future. If you leave the schedule field blank, messages are sent immediately.
Find an invoice by invoice No. or by registration No.
When you only know the invoice or registration number you can search for the invoice via the 'Find Invoice' report under Finance in the Dashboard.
Please note that this invoice will always be in English. Send the invoice to customers via the usual channels in order to present the invoice in your local language.

If you have the OCR code
Please note that if you have the OCR code it is easier to search for the person directly by the person ID which is part of the OCR.
Setup and use dedicated makeup groups
Makeups can either be setup to use canceled slots on regular activities or it can be setup to use dedicated makeup activities that are not open for registrations. This FAQ describes the latter.
To setup one or more dedicated makeup activities you need to first setup a dedicated group.
If you want more than one level, or split by different age, you will need one group for each level. Set the desired limits as you usually do.
When the group is set you need to register the activities for the makeups.
The first important point here is that the 'Max participants' sets the maximum allowed makeup registrations on the activity.
The most important point is that you do not open this for online registrations. So do not set the 'Website End' date. Set 'Timetable' in order to show the activity on your timetables and let participants with illegible makeups register.
This activity will then only be bookable by illegible makeup participants according to the group settings.
Setup the groups to control dedicated makeups.

The group shown on the left hand side above is the regular group (the 'From' group), with ordinary registrations, where you do not want participants to sign up for makeups on canceled slots. Instead you only want makeups to sign up on one or more dedicated make up activities under the group as shown to the right (the 'To' group).
Set the 'From' group:
- The group itself is setup as you usually do
- Do not mark the group 'Make-up lessons' (setting this would potentially open up for ordinary make-ups in the chosen groups)
- Do not select any facilities
- In the sub window under 'Make-up activity group' choose the dedicated makeup group (here 'Make-up Goldfish')
- Important Set the 'Ignore balance check' (or the slots will not be bookable for anybody)
Set the 'To' group (the dedicated makeup group):
- The group itself is setup as you usually do
- Mark 'Make-up lessons' to open for makeup bookings
- Set one or all facilities
- Do not set any 'Make-up activity group' in the sub window
Setup the desired makeup activities
Choose the dedicated makeup group for the activities and set the 'Max participants' to decide how many makeups can sign up.
If you have setup everything correctly the activities are now ready in your online booking for illegible participants to sign up for makeups.
These activities will also be available on your timetables and in your Star Tracker.
Ordinary registrations on dedicated makeup activities
Please note that technically your administrators can register ordinary participants on these activites.
We strongly advise against this as you will destroy the automation and eventually over-book the activity!
A help to avoid this can be to name the activities in the same way as the group shown above is named; 'Make-up Goldfish' and so forth.
Perpetual bookings with automated registration
Please note that there is no automation in the following cases
In some cases you will experience that the user is not automatically signed up for the upcoming activity/activities.
- If you manually change the upcoming activity to a different group the user is NOT signed up
- When you manually register a new activity, that has not yet been picked up by the perpetual automation the user is NOT signed up. Ie if you manually add March, a user who signs up for March will not be signed up for April. The automation will kick in with registrations from April.
Participants booking a perpetual activity are now automatically signed up for all existing, consecutive activities
If your schedule of monthly perpetual activities is already registered (no matter if it is published or not) for say March, April, and May and a participant books (via your admin or via the online booking) a slot on a March activity, he or she will automatically be signed up for the April and May activity as well.
All the consecutive registrations will be in separate invoices and will not be sent out automatically. These invoices have to be sent by your admin.
The invoices of the consecutive/upcoming activities will have a due date of the first of the month where the activity starts. Ie if the customer signs up for a March activity and is automatically signed up for the April and May activities, the April invoice will have a due date of first of April and the May invoice a due date of first of May.
This feature has to be turned on by contacting Support.
Technically your setting 'AUTO_REG_FUTURE_PERPETUAL_COURSE' must be set to 'true'.
How to send future registrations
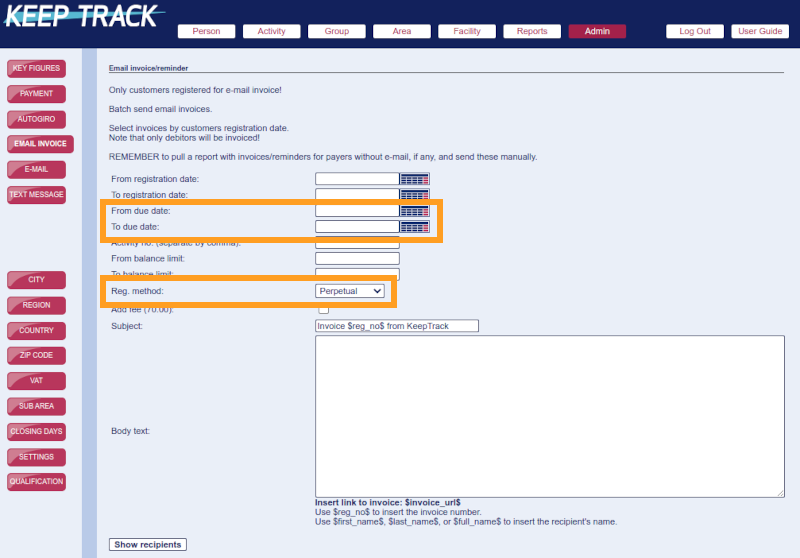
Go to 'Email Invoice', choose 'Reg. Method: Perpetual', set the desired 'Due Date' period and you will have a list of relevant, future invoices to send.
If your perpetual period is monthly you should do this on a monthly basis according to your payment terms for customers.
Please note that if a customer cancels a registration your admin will have to manually cancel all consecutive/upcoming registrations.
Handle the daily and weekly changes to instructors' schedules with the Dashboard app
Quite often you need to change instructor on one or more lessons. For instance when there is sickness or other daily tasks to handle.
On the front page, after login, Admin, Trust, and HR users will find the following area for different apps to make changes to your database. Here the 'Instructor Handling' app is shown.

After you click the button you get the first view where you choose what to see in the schedule

Fill in at least date and then facility or instructor
Note that you can simply start typing and search for the relevant facility or instructor. You can further choose by your keyboard.

This brings up the weekly schedule for the period and facility you chose. You probably have to scroll down to see everything.
For every lesson, and in the corresponding tooltip, you have the following information:

- The start time
- The activity name
- The instructor No.
- The instructor first name
- In parenthesis you see the instructor initials and the instructor type
- Lastly you see the area name
At the bottom of the schedule you have easy access to an overview of the corresponding instructor type numbers and names.

To start editing you simply click on the lessons you want to edit which turn red when you choose them.

Once you start choosing lessons you get access to the edit options. You can add an instructor, change the instructor type or delete an instructor from all the chosen lessons simultaneously.

Choose the appropriate information, click the button and the schedule will immediately refresh and show the updated schedule including your changes.
Please note that nothing changes untill you click on one of the active buttons. Buttons only become active when you fill in the mandatory information.
If an online user cannot change password a super-user can do it for them
Find the user with the email (the payer) and click on one of the 'Pay' buttons on a registration row (any of the buttons will do)
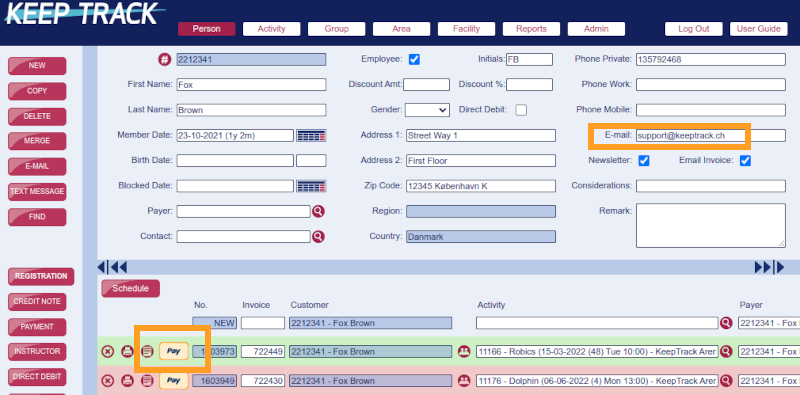
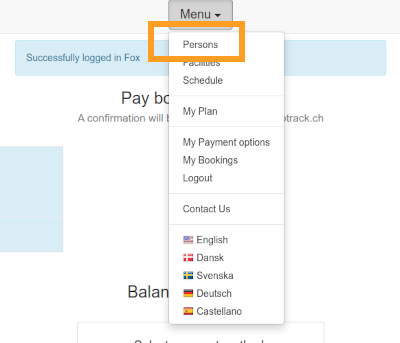
You are now logged in to the customers online account. Click on 'Menu' and choose 'Persons'
Click on 'Edit' for the Payer

Fill in the new password, approve the data policy and click 'Save'
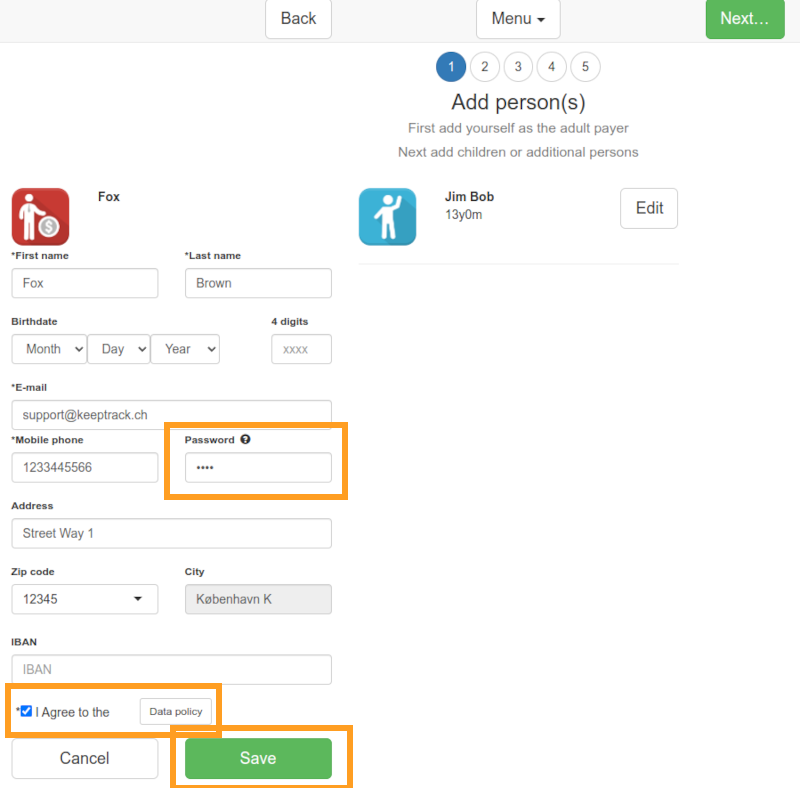
The password has now been updated.
Remember to inform the customer
Inform the customer of the new password by email, SMS or phone.
The invoices you send to end users are interactive and web based but you or your customers can easily save them as PDF's
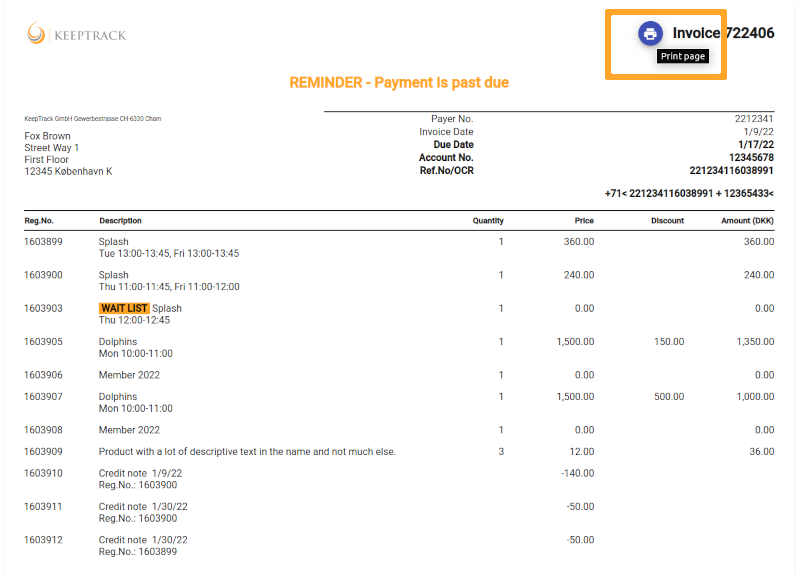
To get your invoice in PDF simply click the blue print button as marked above.
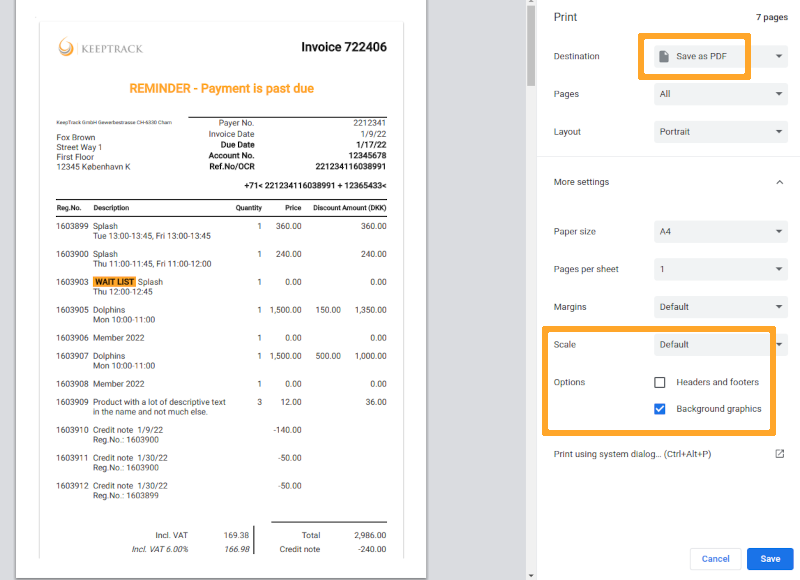
If it is not already set choose 'Save as PDF' and alternatively mark 'Background graphics' as marked above.
Finally click 'Save' and open or send the PDF invoice.
We recommend using the blue print button
Please note that you can of course use your computers keyboard shortcut (Ctrl+p or Cmd+P) or print function but we highly recommend using the blue print button as the result will be marginally better here.
Mobile devices: If you want to save the invoice as PDF on your mobile device you can still use the blue print button if you rotate the device to landscape mode.
The Dashboard is a replacement for super-user reports
You need a special account for this. Please contact your administrator to get an account. Accounts use the same rights as super-users.
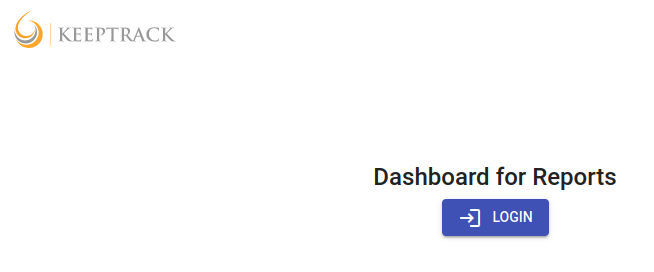
You login at https://keeptrack.dk/db
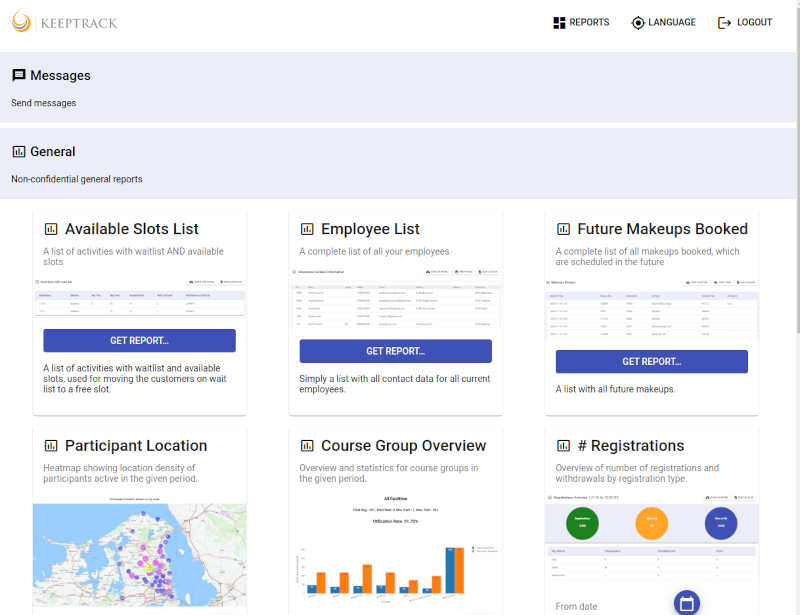
Go to the dashboard report overview page by clicking 'Reports'
Click on the section you want to use (accessible reports depend on your user rights) and pull the report you need.
The Dashboard has replaced super-user reports
Going forward all reports are found in the Dashboard. You will need a Dashboard account in order to access these.
The Dashboard also contains Key Figures and new tools for tasks like SMS and Discounts. Further it is constantly updated with new features.
Please go through your administrator to get a personal Dashboard account through KeepTrack Support.
Group is blocked on activity
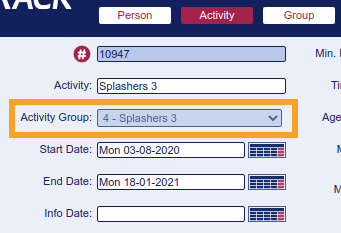
When you have perpetual activated then activities running under perpetual groups will be blocked for switching the group.
This is in order to avoid mistakes where the group is switched on an activity which is running in a perpetual series.
If you know the implications, or the activity is new, then you can switch the group in the following way.
Tick 'Perpetual exclude' and update the page. This opens the group field

- Switch the group, untick 'Perpetual exclude' and update the page
Why is this?
If you have a rolled over perpetual activity that needs to be switched to a different group it is better to make a new activity under the new group and delete the 'old' activity. Again this is in order to avoid confusion under the perpetual system.
Expert Tip
You can go to 'Activity' 'Find' and change the group directly.
Go to 
Find the activity you want to change.
Change one row/lesson at a time
In this example we will change the top lesson from 12.00-12.45 to 12.30-13.15.

Click into the fields, remove both weekdays and change the times accordingly.

Click outside the blue marking and you're done.

Continue with the rest of the lessons where applicable.
Perpetual
Please note that 'Perpetual exclude' is automatically set on lessons you change.
Sometimes you cannot change the 'Max participants' to a lower number even though there seems to be less participants on the activity at the time being. When you try to do it you get an error message about there being too many participants.
Example: There are 'Max participants = 5' on the activity and right now you only have 4 registered participants. Still you are not able to adjust to 'Max participants = 4.
This is because the max participants are calculated at any given time during the activity run time.
See below where you have 4 active registrations after 11/2 (Reg 1033, 1034, 1035 and 1036) but in the periods 28/1 (Reg 1030, 1031, 1032, 1033 and 1034) and 29/1-11/2 (Reg 1031, 1032, 1033, 1034 and 1035) you have 5 participants. Thus the 'Max participants' can never be set below 5.
Activity running 1/1 - 28/2
| Participant | Date 1 | Date 2 | Date 3 | Date 4 | Date 5 | Date 6 |
|---|---|---|---|---|---|---|
| 1030 | 1/1 | 28/1 | ||||
| 1031 | 1/1 | - | - | 11/2 | ||
| 1032 | 1/1 | - | - | 11/2 | ||
| 1033 | 28/1 | - | - | - | 28/2 | |
| 1034 | 28/1 | - | - | - | 28/2 | |
| 1035 | 29/1 | - | - | 28/2 | ||
| 1036 | 12/2 | 28/2 | ||||
| Total # | 3 | 5 | 5 | 5 | 4 | 4 |
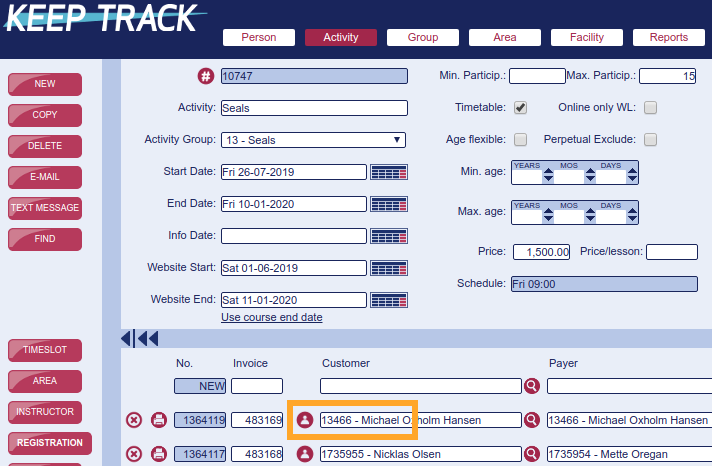
Easily jump from 'Person' to 'Activity' and vice versa
Under 'Person' you simply click the  button and you are sent to the corresponding activity
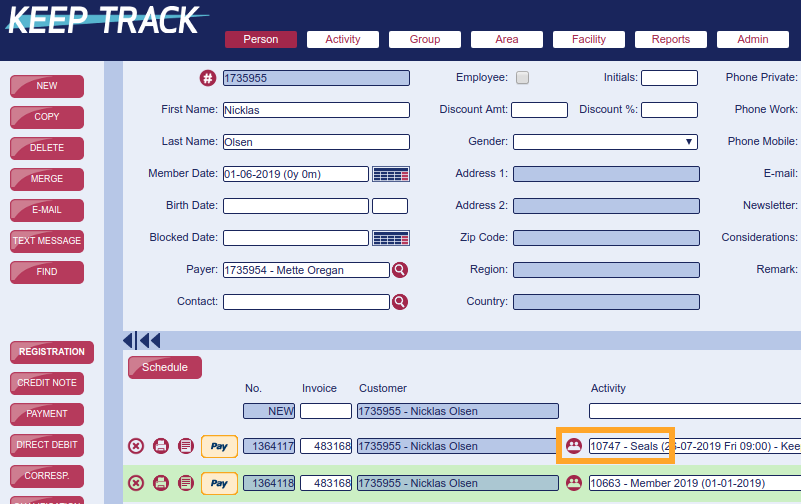
Under 'Activity' you simply click the  button and you are sent to the corresponding participant
Under 
 you'll find a column named 'Instructor Type'.
This is used for different things such as
- Schedules
- Visibility on Timetable, Star Tracker and the like
- Salaries
- HR information
- Reports
Overview and explanation
| Name | German | Spanish | Color | Included in Salary | Comment |
|---|---|---|---|---|---|
| Main | Kursleiter | Permanente | green | yes | The green markings indicate the instructor/schedule is planned |
| Stand-in | Vertretung | Sustituto | none | yes | |
| Sick | Krank | Enfermo | red | yes/no | Note: Germany salary, Spain no salary, US no salary, UK no salary |
| Absent | Abwesen | Ausente | red | no | The red markings indicate the instructor is absent |
| Trainee | Ausbildung | Aprendiz | none | no | |
| Supervisor | Ausbilder | Consejeros | green | yes | |
| Assistant | Assistent | Asistente | none | yes | |
| Student | Student | Alumno | none | no | |
| Stand-by | Stand-by | Standby | yellow | no | The yellow marking indicates the instructor is on duty but not present |
| VAB | VAB | VAB | red | yes | Sweden |
| Office | Office | Office | green | yes | |
| Vacation+ | Vacation+ | Vacation+ | red | yes | |
| Vacation | Vacation | Vacation | red | no | |
| Inspiration | Inspiration | Inspiration | none | no | |
| Stand-in-sick | Stand-in-sick | Stand-in-sick | none | yes | Stand-in for a sick colleague |
| Stand-in-off | Stand-in-off | Stand-in-off | none | yes | Stand-in for a colleague on leave |
| On-deck | On-deck | On-deck | green | yes | |
| Absent-approved | Absent-approved | Absent-approved | red | no | |
| Absent-not-approved | Absent-not-approved | Absent-not-approved | red | no | |
| Hospitant | Hospitant | Hospitant | none | no | Germany |
| PT | PT | PT | green | yes | |
| KK | Kind-krank | red | yes | Germany |
People with a Gravatar account will automatically expose their profile picture in the person view (only "G-rated" pictures are shown).
Only the owner of the Gravatar account can edit or change these pictures.
![]()
You can register your own account, or accounts for your staff, for free via https://gravatar.com
Recurring payments and perpetual classes
Having on-going classes where the participants are registered until they actively opt-out is probably the easiest and most lucrative form of running your terms. Especially when combined with recurring payments. Do note though that this often forces you to run monthly terms which makes it possible for participants to opt-out with a months notice (as opposed to up-front payment for quarterly or bi-quarterly terms) and you might also end up increasing your administration.
Proactively offer participants a place for the coming term
When the time comes to start planning for the next term there will be multiple ways of handling it. Here we describe the method that gives you the by far best retention rate: Proactive offer for all current participants
Benefits of offering new slot for all participants
- Your retention rate goes up. Probably by as much as 10-30 percentage points compared to 'first come first serve' sign-ups
- You are in full control of the term and participants on the correct levels
- Your customers are relieved of the anxiety during 'first come first serve'
- It's much easier for your customers. They just pay and some might have to change day and time
- It's better service
Downsides of offering all participants new slots
- Your administrative workload with planning schedule and moving participants will increase
Suggestion for procedure
1. Evaluate and register
Evaluate and register all participants' level for the next term via Star Tracker. You will primarily use the buttons *1* *2* og *3* but you can enhance the control and information by also using qualifications. (See separate FAQ for the use of the Star Tracker.)


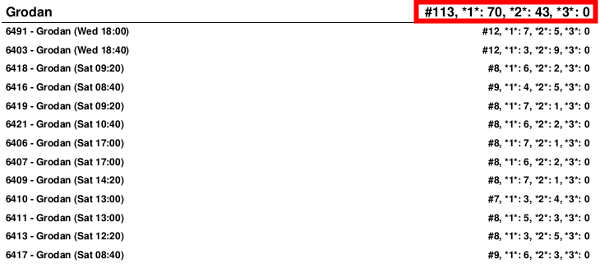
2a. Pull the report 'Promotions group/activity'
Pull the report 'Promotions group/activity' for individual facilities to overview of the need for number of activities at the different levels/groups. This report can also show the entire company if you for some reason should want that.
In this report you find the sum of marked digits for the groups: Totalt number of participants in all the groups activities = 113, 70 move up to next level, 43 stay at the current level and 0 end their registration.
Note that if the numbers at 1, 2 and 3 doesn't add up to the total then certain participants level needs to be registered. In the example we have 70+43+0=113 so all participants are registered.
Under the activity-group you'll find information for every activity.
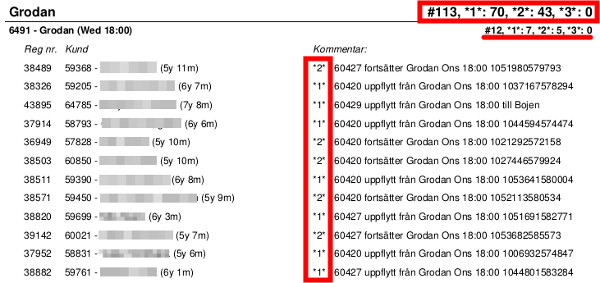
2b. Pull the report 'Promotions group/activity/participants'
Pull the report 'Promotions group/activity/participants' to run through or overview the situation for all participants.
In the top marking in the image you'll find the same information as the group in the previous example. In the same way you find information (underlined) for all activities.
The different is that in this report you'll find all individual participants with exact information on who's on which level. You use this individual information when you register the correct activity for the next term.
3. Register 'Closing Days'
It is important that you under 'Admin' 'Closing days' register all Holidays and other closed days for your business/facility before the schedule for the next term is registered. This will save you a lot of time and error correction.
4. Register the new schedule
Register the exact schedule for the coming term.
5. Adjust the schedule
Adjust the schedule for errors and changes
6. Copy all participants to the new activities (if you didn't include it in bullet point 4)
Go through all activities/participants levels from bullet point 2 and copy all participants to the new term via 'Activity' 'Registration' 'Copy Cust' where you can batch copy participants from each activity.
7. Quality Assurance
Go through everything for errors and corrections
8. Send invoices
Send all invoices via 'Admin' 'E-Invoice'
'Passive opt-out' according to rules in some countries
Note that you might have to give customers the option of passive opt-out to stay within the scope of consumer rules in several (European) countries.
When you have sent invoices you will experience participants who haven't paid by the due date. You can then send a polite and descriptive reminder for the unpaid invoices and when this second due date passes you un-register the unpaid registrations.
A tip for enhanced win-back is to collect (register on waitlist) all these un-registered people in a separate activity and then send service mails about the un-enrollment and how they can re-enroll in your program.
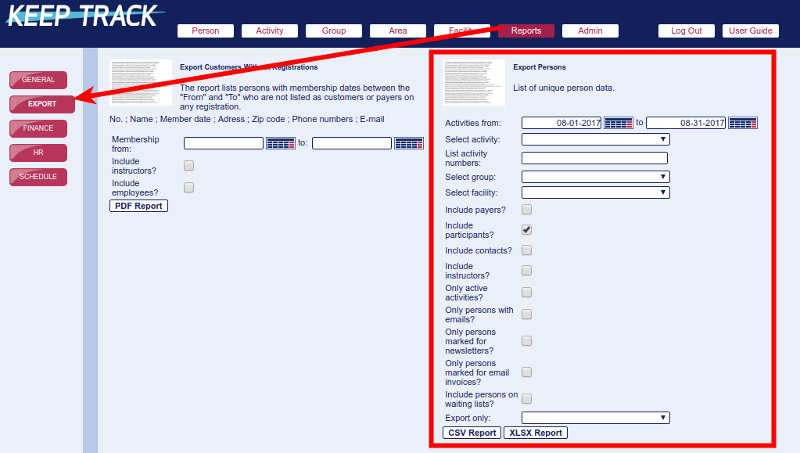
Use the report 'Exports' 'Persons Data' (please note that you can also utilize 'Export Customers Without Registrations'.
Choose what to include and download the file.
Please note that the file uses semicolon (;) as separator.
You can now either import the file directly in an external program or open and edit in MS Excel.

If you want to assist a customer in cancelling a lesson, registering a makeup lesson or any other task just follow this procedure
- Find the person you want to assist under 'Person'
- Under 'Registration' click on
 (any of them)
 - A new window opens
- You are now in that persons online account
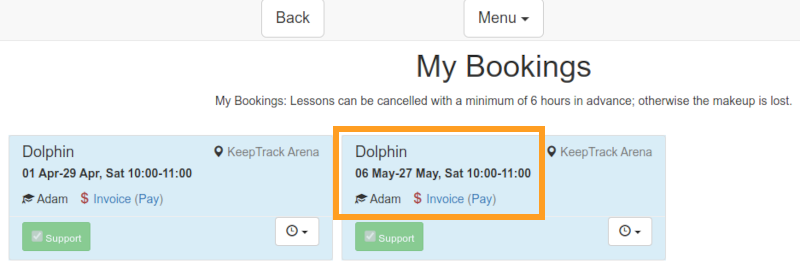
- Click on 'Menu' and choose 'My Bookings'
- Cancel or register the desired lessons
- Logout via 'Menu'
That's it!
There is a lot of data available to assist you in your company's strategic development
1) Admin-'Key Figures' (image below)
- The number of new members (people) during the period
- The number of new registrations (bookings on an activity) during the period
- The number of active members (people)
- The outstanding balance (customers owe the company)

2) Reports-General
- 'Activity group overview and statistics, details' you'll find the total number of registrations and available slots (can show you how well you are utilizing your facilities/resources)
3) Reports-Finance
- 'Activity and group payment' gives you the actual cash-flow/revenue for the company and the different facilities
- 'Registrations/Withdrawals' shows you how your customers have registered on activities ('Auto' and 'Online' are automatic and self-service and all other ways, including no specified way noted, are registrations handled by customer service manually)
- 'Attendance' shows you the attendance numbers on company and group level
4) Reports-HR
- 'Instructor Type Hours' shows the total amount of instructor hours for the company and the distribution per instructor type during the chosen period and furthermore, the same figures for all individual instructors. Here you can easily find your company's sickness or absence rate.
- 'Retention rate' shows the number and percentage of members during period 1 who is also a member during period 2. The numbers are shown for the entire company, for individual facilities and for the individual instructors with the chosen instructor type. We recommend using 12 month periods
'Business Intelligence' on Amazon
Apart from that we recommend this book on Amazon
Your staff now have one of the most powerful tools on the planet for handling your 'stars'
This saves you, your staff and your company a lot of resources and at the same time ups the game for your competition.
All you have to do to get going is this
(Please note that not all features are necessarily available)
Make sure 'Timetable' is set on all activities
Go to https://[YourDatabase].app.keeptrack.dk/admin/login
Login with your company PIN code (or with your personal login if you have been given access)
Choose the facility you are at
Optional - Choose a specific area
Optional - Choose a specific instructor
![]()
![]()
What can I do and see?
Please see separate FAQ for the Front-Desk version
The 'Previous' and 'Next' buttons bring you to the previous or next activity
The 'Load more' button loads one additional activity in addition to that/those already on the screen. Just click multiple times to see many activities simultaneously

Activity header
Background color indicates status. Red: Lesson in the past. Yellow: Ongoing lesson. Blue: Lesson in the future
Activity number
Lesson time
Activity name
Instructor(s)
Area
Area color
Participant card
Participant name
Participant age
Participant indicators under the name:
'Visitor' only present/registered on this single lesson (ex.: Make-up participant) First time attending this activity Considerations noted. Touch/click icon to read details Participant is registered on next/future term Participant is cleared for next level All invoices, which have past due date, are paid (the payer has no outstanding balance) All invoices are paid and there is outstanding credit Participant birthday within the coming 6 days. Touch/click icon to see exact date No payment options on file (Only applicable if you use credit card payments/direct debit via information on file) Participant has end registration date set. Touch/click icon to see exact date Attendance history (past 0-10 lessons)
Participant was present Participant was not present Participant cancelled (and was not present) Active attendance for present lesson:
Participant is present (click to toggle) Participant is not present (click to toggle) Participant has cancelled (and is not present) Qualifications:
The qualification is not met The qualification is not met and blocks the next level The qualification is met Comments from the registration comment field
Blue buttons:
Comments page

See the participant, the payer and contact full names and phone numbers
Mark or un-mark qualifications
Read additional internal information on marked qualifications
Write comments
Your front-desk staff now have one of the most powerful tools on the planet for handling attendance
This saves you, your staff and your company a lot of resources, improves customer service and at the same time ups the game for your competition.
All you have to do to get going is this
- Make sure 'Timetable' is set on all activities
- Login to your Star Tracker as usual
- Click the button

![]()
![]()
![]()
What can I do and see?
- Please see separate FAQ for the Star Tracker version
- The 'Previous' button brings you to the previous activity's participants
- The 'Next' button brings you to the next activity's participants
- The 'Load more' button loads participants from one more activity in addition to that/those already on the screen. Just click multiple times to see many activities simultaneously
- The 'Next' button will now function a little differently as it "moves" all activities one step forward (hides the participants from the first activity and shows the participants from the next activity). Use this function during the day in order to successively hide past activities.
We recommend using a FullHD monitor in the vertical position as depicted
For additional usability you could choose a touchscreen monitor.
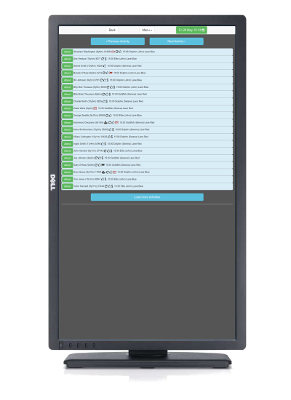
Participant cards, function
- Background color indicates status. Red: Lesson is over. Yellow: Ongoing lesson. Blue: Lesson not started
- The green button is used for marking attendance
- Participants are sorted alphabetically by their first name
- You will have to confirm before a participant is marked as present
- Participants marked present will disappear from the view
- Participants who cancelled their lesson is not shown
- If you accidentally mark the wrong participant as present you'll have to switch to the Star Tracker, find the person and de-select the attendance
- Click the button
 to switch to the Star Tracker
 - If you want to "reset" the view you can easily do this by switching to the Star Tracker and back again
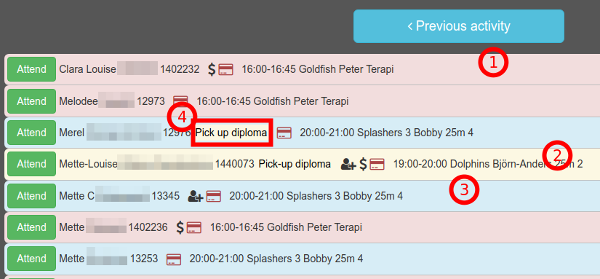
Participant cards, content
- (1) Red background indicates the lesson is over
- (2) Yellow background indicates the lesson is ongoing
- (3) Blue background indicates the lesson has not yet started
- Attendance button
- Participant full name
- Participant age
- Participant customer number
- (4) Registration remark
- Participant icons (same as Star Tracker)
- Lesson time
- Activity name
- Instructor
- Area
- Area color

In the Star Tracker you have a visual schedule with daily overview for individual facilities
- Login to your Star Tracker
- Choose a facility and click 'Submit'
- Open the menu and go to 'Schedule'
- Choose a date (optional)
What is shown?
All activities with 'Timetable' checked will be visible

This information is shown
- One facility
- All areas
- One day
- The schedule per area
- Lessons with the following details
- Activity number and name
- Instructor first name and initials
- Number of registered participants
- Number of available slots
- Group color
On hover/touch you see all details for the lesson

Colors
- The lesson color is based on the color you have set under 'Group'
- If no color is set the lesson will be gray

Change facility
To show a different facility please go to the menu, choose 'Attendance' and start over
In order to terminate a participants registration at the end of the current term you can use the Star Tracker. For details or custom settings please use the super user interface.
Click the 'Edit' icon on the participant to see the edit window.
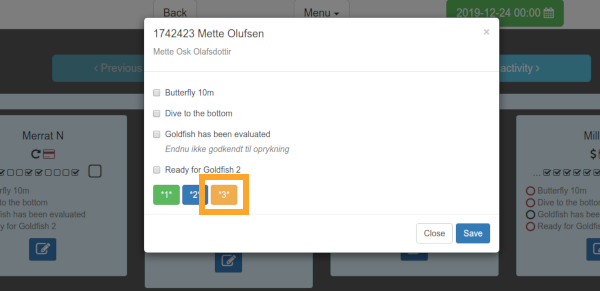
Click on *3* in order to end the registration. This will set the participants 'end registration date' on the current registration.

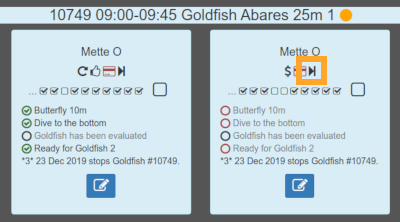
After updating the view you will see the icon indicating that participant has end registration date set (registration terminated at end of term). Touch/hover icon to see exact date
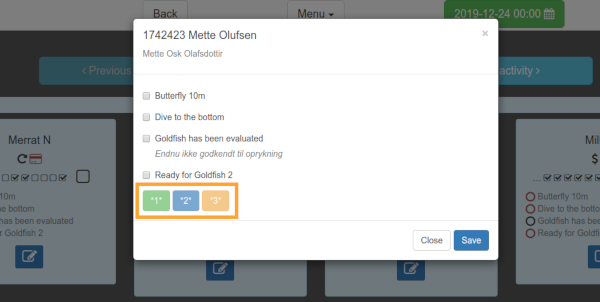
Next time you open the participants edit window all three buttons are disabled. Alter this via the super user interface if reopening is needed.
'My Plan' gives you fast communication and less errors as staff and instructors can easily see a live and detailed overview of their work-day on their smart-phone.
Any scheduled person registered as an employee can see their plan

Staff access via online booking
Login to the online booking and choose 'My Plan' in the menu

The first page shows the coming month from today with off-days marked in yellow
- You can choose another month via the date-picker
- Off-days are marked in yellow
- Link to map of work-place
- All involved instructors during the shift/classes are listed
- Start-time, end-time and duration of the shift is listed

Open the detailed day view via the
- Individual lessons/classes are marked in green
- Breaks are marked in white (these are automatically inserted so no need to schedule breaks from the administration)
- Name of the lesson/class
- Area where the lesson/class takes place
- Start-time, end-time and duration of the lesson/class is listed
- Number of participants
- Scheduled instructors and their role

When a user is logged into your online booking and goes to 'My bookings' in the menu they can see the following information. This saves your customer service a lot of time when users can self service.

Information on the page
Icons
Waitng-lists can be un-registered by clicking the relevant name button
Links you to a map with the facility Shows the instructor The invoice has outstanding balance and the link downloads the updated invoice and information When there is outstanding balance and your company is using the credit card function the trailing text will say 'Invoice (Pay)' and the customer can, by clicking the link, pay the outstanding amount directly in her account
The invoice is paid and the link downloads the updated invoice and information Opens up to show the last 5 lessons and the coming 10 The user did not attend the lesson The user attended the lesson The user cancelled the lesson The user cancelled the lesson and can 'un-cancel' it again
Qualifications
The qualification/proficiency is not met The qualification/prerequisite is not met and blocks the next level The qualification is met
Please note that customers can only see what you have made publicly available
By checking 'Activity' 'Timetable' in your super-user control panel
and the course end date must not be passed
Eg. if the user has registered but 'Timetable' is not checked or the course has ended the user cannot see this registration.

Per default the users qualifications are visible to the end user through 'My Bookings' in the Online Booking. But you might not want to expose all of the qualifications to your end users and you can easily handle this through 'Admin' 'Qualifications'
Please note the different settings
- Hide qualifications from 'My Bookings' but keep them visible in the Star Tracker
- Hide qualifications from 'My Bookings' and hide them in the Star Tracker
Hide from 'My Bookings' only

Hide from 'My Bookings' and Star Tracker

It is very easy for your customers to handle one or more credit cards directly in their online account via the menu 'My Payment Options'
Your staff can also handle this directly from the super-user interface
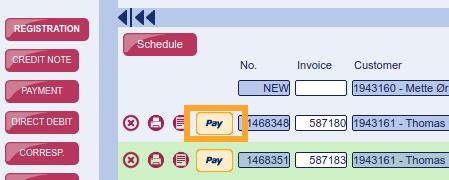
As a super-user you can handle the entire account for any person by clicking the 'Pay' button at any existing registration. Just choose in the menu. This includes taking payments, handling existing credit cards on file or adding new ones via 'My Payment Options'.
Overview of credit cards on file
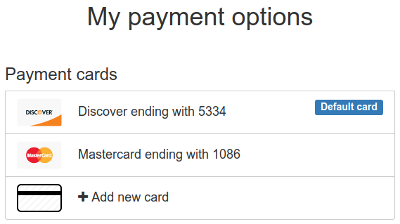
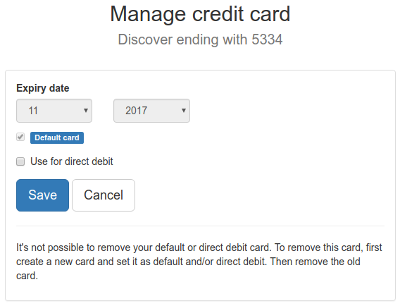
Handle existing cards
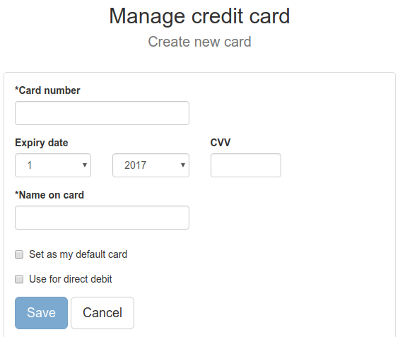
Add a new credit card
Easily collect credit cards
You can send out an e-mail with a link directly to 'My Payment Optiions' https://[yourDatabase].app.keeptrack.dk/user/payment/options which sends the user to the login page and then directly to this page in order to enter a new credit card or handle existing ones.
It's very easy to take payments over the counter with the customers credit card on file directly from the super-user interface via the online booking app.
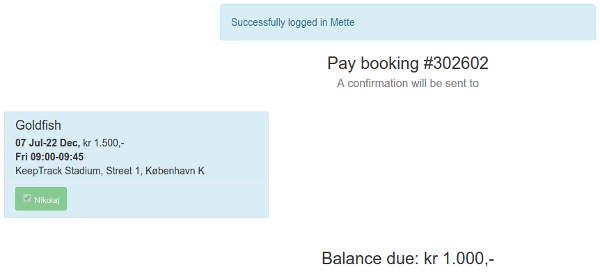
Find the person and registration you want the customer to pay and click on the 'Pay' button. This will send you to the online booking logged in to the customers account.
If the invoice has no outstanding balance you will be informed

You will be logged in as the owner of the invoice and with the outstanding balance
Choose the payment method, choose one of the credit cards on file or add a new one
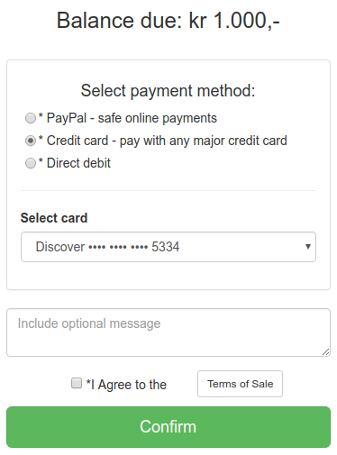
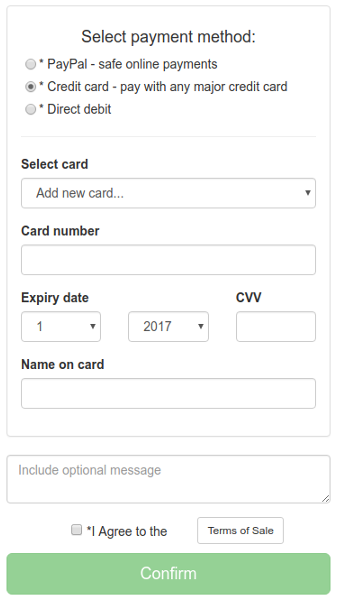
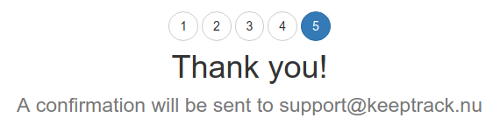
Agree to the Terms Of Sale and click 'Confirm' and you're done (the confirmation is automatically sent to the customer)
You can handle the entire account
As a super-user you can handle the entire account for any person by clicking the 'Pay' button. Just choose in the menu. This includes handling existing credit cards on file or adding new ones via 'My Payment Options'.
Use your Star tracker
In your Star Tracker you find all birthdays listed directly on the participant up to a week before the actual date.
A dedicated list
You'll find a list of birthdays via  and
and 
In the example below we have chosen all activities running in August and a list of participants (just tick 'Payers' 'Contacts' 'Instructors' if you want their birthdays as well). Open the downloaded Excel file and just extract the data you need.
Please note that you can of course only get birthdays on people you have registered their birth date on.
Via 
 you can send out invoices or reminders. Note that the online invoice automatically transforms into a reminder when the invoice is past due. This means the invoice and the reminder are essentially the same document and the same link.

- Choose the interval from 'Due date' as shown (the 'To due date' should be at least as far back as your standard grace days to avoid reminding customers who have not yet past the due date)
- (It is possible to use 'Registration date' instead but unless you have very specific reasons for this, like sending out batch invoices, we recommend using due date instead. Especially for reminders.)
- Note that you need to insert the invoice link code
$invoice_url$into the body text. This is the customers link to the invoice when they receive your email - Change the subject and body text to your liking (it will reset to the default on every new login)
- Click 'Show recipients' and review these before you send all the e-mails
The reminder/invoice due date will always be the due date set on the individual invoice. In order to change the due date you have to do this on the individual registration.
You have multiple options to see your total registrations but the fastest and best overview is found in your Dashboard.
Administrators see the Key Figures

Here you find the most important figures. If you need more details, try one of the reports.
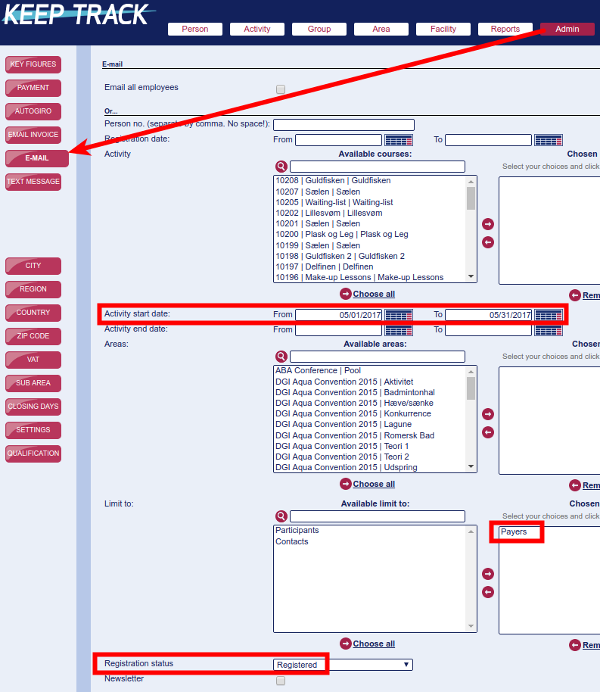
Go to  and fill in at least the following as shown in the screendump
- 'Activity start date' - The interval covering the start dates for your present activities
- 'Payers' - To send the e-mail to the payer. You can even choose contacts
- 'Registration status' - Choose registered, wait list or both
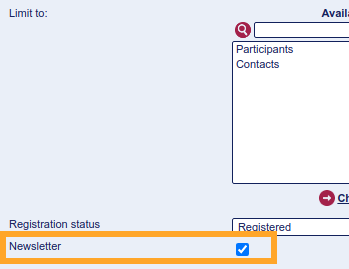
Sending Newsletters?
If you want to send newsletters or other marketing related emails and thus honor the recipients status of whether or not they have opted out of this (meaning that the person has unticked the 'Newsletter' box) you will have to mark the email as such before sending.
Note that you have to check the 'Newsletter' box before you click on 'Show recipients'!
Use the same procedure as when registering activities
You can register participants for individual lessons when you need trials or the like. Use the dedicated make-ups function for make-ups! Just do like this:
- Go to the participant and click
 on the 'New' row
 - Find any activity in the required group and click the calendar icon

- Click any day for the relevant month and week to see all lessons this week in the chosen group/level
- Click the lesson you want to register
- Change the price to 0 (zero) if the lesson is free
- Send confirmation/invoice to the customer by clicking


This sets the 'Start reg. time' and 'End reg. time' to the corresponding lesson time.

You can only register participants on individual lessons when the activity has free slots (on this lesson).
Furthermore be aware that individual lessons booked will block registrations for the entire activity until after the lesson is over.
Color codes on activities


Background color codes
- Red background = Ended activity
- Green background = Ongoing activity
- No (gray) background = Comming activity
Only trusted and admin users can change ended (red) activities!
Field color codes
- The price field is green when the invoice is paid in full
- The wait date is red for clear distinction between a registration and a waiting list
A general waiting-list is just an activity
Make a new activity and follow these steps
- Set 'Max participants' to 0 (zero) to force all registrations to waiting-list. This is to 1) Prevent 'false positives' in registrations 2) Clearly list the registration as a waiting-list
- Use

 once a week to avoid listing the wrong 'Closing days'
 - Use the exact same start and end time (ex 00:00-00:00) to avoid the time being displayed
- Set an area on time-slots to connect the waiting-list to the facility it concerns
Time-slots with areas are only necessary if you want to connect the corresponding facility to the waiting-list. Setting the lessons/time-slots to zero minutes (see example below) makes the lessons not show up online. Furthermore you can either make a specific group for all waiting-lists or you can choose the relevant group to place 'open' waiting-lists in all or some specific groups.

Invoice and registration information
Page 1 - The invoice
Page 1 contains the following information

- Your company logo*
- Print button
- Reminder warning when due date has passed
- Recipient information
- Payment information
- Information about wait lists and activities and products bought
- Information on credit notes (if any)
- Payment details
- Your company contact details*
*You can update your company logo and contact details by contacting KeepTrack Support.
Following pages/cards - Information on the individual bookings/activities
In the following cards you can add information on the specific registration. One card for every registered activity or product.
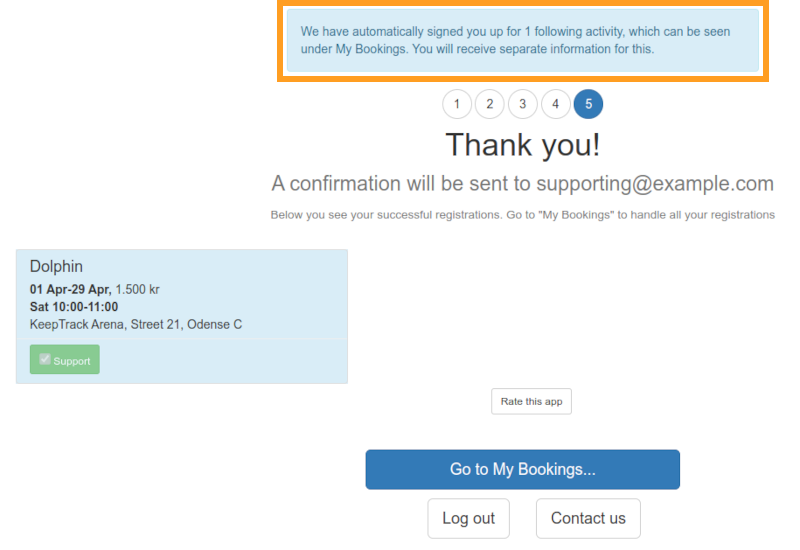
The first paragraph is standard text/information from the system:

Enrolled customers will get all available information. If the schedule is only once per week there will be calendar events to import to your personal calendar, information on closing days and a direct link to Google Maps with the facility in focus.
The group image on the right is uploaded via your super-user interface. See https://www.keeptrack.ch/faq/faqen#2010

Customers on wait list will only see information relevant for the wait list and will furthermore see emphasized information on what they can expect to happen if they get a spot.
Additional paragraphs are merged in from 'Invoice info' in this order.
- Activity
- Group
- Area
- Facility


We recommend that you try to only use 'Facility' and 'Group' in order to save yourself from entering data everytime you make a new activity but you can of course even use 'Area' and 'Activity' when needed.
The 'flow' for the text is following the arrows: Text on 'Facility' is included in all activities in this facility, text on 'Group' is included in all activities under this group and text on 'Activity' is only included on this specific activity.

Formatting the text
You can format the text on the invoice through these HTML tags/elements.
<p></p>
<p>Place these around text to make it a paragraph with margin above and below.</p>
<b></b>
Gives you <b>Bold text</b> between the tags.
<br>
Line break<br>
where the tag is inserted.
Gives you a space (new paragraph but without margin)<br><br>
when you insert two tags.
<a href="URL">Click here</a>
Gives you a link with a saying name. Ie <a href="https://keeptrack.ch/faq">Click here</a>
Do not use any other attributes, or the link will fail.
By default all registrations through the online booking in the same session will be included in the same invoice.
As an administrator you can handle this through the super-user control panel under 

Please beware of the following
- This is only possible with registrations under the same payer
- Be careful to enter the correct number in the field or you will get errors
- You might have to handle certain data manually when altering this. That could be 'E-Invoice' financial data and more
- You should not bundle registrations from different dates into the same invoice (in this case you could(!) alter the dates but we strongly advise against this)
If you entered the invoices into your bookkeeping
Invoices you have entered into your bookkeeping should not be altered this way.
In the example below you have three registrations where two are on the same invoice and the last is on an individual invoice. In order to get all three registrations on the same invoice you will have to change the last invoice number (282913) into the same as the other two (282912). All three registrations are now on the same invoice no matter what invoice button you click.

The information displayed in the schedule on your online booking, you add via  and
and
- Heading with explanatory text from
- Activity name with other information from

The groups name and 'Web info' appear online.

As well as other data from 'Activity' as shown below.

You can see the following data online (some information can be hidden)
- Facility
- Group
- Activity
- Activity start date
- Activity end date
- Activity lessons
- Number of lessons
- Price
- First name of instructor
The super-user Staff account is primarily used for instructors and frontline service staff with the need to assist customers on-site.
- Person
- Register new customers
- Change information on existing customers
- Change activity on existing customers
- Check customer balance
- Register correspondence on existing customers
- Access online account
- Activities
- Register customer attendance
- Reports
- Attendance lists
- Schedules
Yes. And we strongly advice you to use this feature as it will ease your workload.
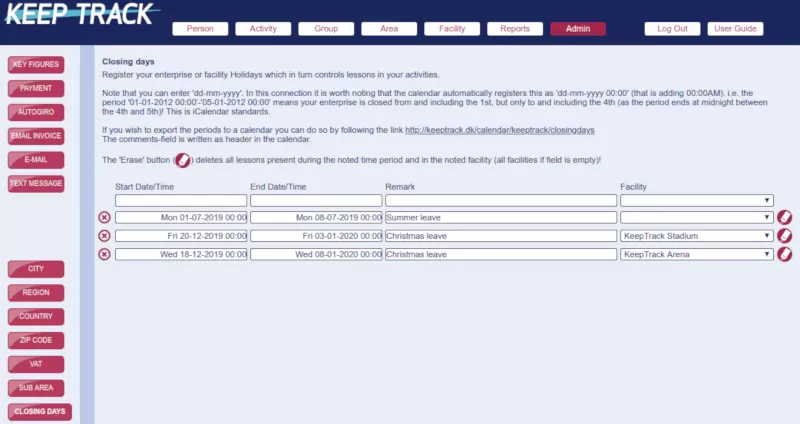
Go to 'Closing Days' where you can register when your business is closed. Please read the information on that page. This function follows the iCalendar standard.
A great advantage of using this feature is that you cannot enter lessons/timeslots on these days which in turn saves you time when you enter new activities. It also reduces errors as the process is automated. Finally you can use the information to export directly to your iCalendar ie Google Calendar and the like.
Administrators, HR-accounts and trusted accounts have access and can edit everything in here.
Administrators and trusted can override this block and enter individual timeslots on Holidays after confirming a warning.

If the calendar does not begin on the right day (Monday/Sunday), just change it by clicking on the desired day of the week as illustrated. (If you accidentally click a little 'wrong' and hit another weekday, the calendar will change to start on this day (which may seem somewhat confusing.))
This feature is standard for online calendars, but the calendar is default set according to the computers locale.
If you are logged in as a super-user but inactive for more than ca. 15 min. you will be automatically logged out and prompted for a password to log in again. You will then be sent back to where you were and can continue from there.
The Star Tracker logs you out after ca 24 hours (but note that you can be logged out earlier if your Internet connection breaks or for other technical reasons).
Go via 'Person' 'Find course'
This applies to ongoing classes/activities!
Go to (it does not matter which person you have in focus).
Click on 

Sort the activities by coloumn by clicking the header.
Go via 'Report' 'Classes'
Go to  and at the relevant schedule choose applicable dates via the calendar in both the 'From date' and 'To date' fields.
Click 'PDF' and open the PDF-document containing the schedule.
I get no content on the webpage
- Check your WiFi/Network
- Restart your browser and try again or try in a different browser (Firefox, Chrome, Safari).
- Restart your router and WiFi.
- If it still does not work navigate to https://83.221.131.66 (instead of https://keeptrack.dk) and allow the connection. If that does not work you most likely have a network failure i.e. your Internet Service Provider is down. Try navigating to other websites to check your connection.
This error is often caused by a problem with your (ISP's) DNS-server (that is the server translating addresses from human readable addresses to machine addresses so you do not have to remember '83.221.131.66', but only 'keeptrack.dk').
If this DNS problem is recurring you might be able to switch to a different DNS server like one of these that are stable, fast and open for everyone to use:
- DNS 1.1.1.1 or 1.0.0.1
- Google 8.8.8.8
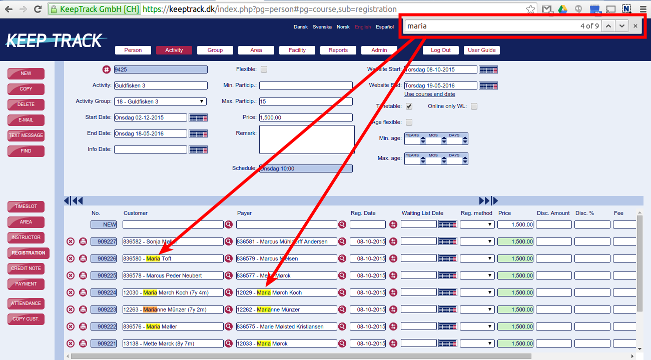
The search function is more or less global and is found under  (and a few other places where you hardly ever need it).
You search by pressing the  button in the left menu under the relevant main menu; for instance . Now you can search in all fields, several combined or just one, with any text. You search in the blue fields on the row with the
  (Find) button as shown below.

Trick!
You can search for entire words, parts of words or individual characters and so on. But try not to search for empty fields (basically means "Show me everything") or very broad searches like customer No '5'. The latter will result in a list of all persons in the database where there is the digit '5' in the customer No. And that is probably a lot!
You will get a warning though if your search results in more than 100 hits.
Example: Search for 'John Moxley'
You can search for almost any data like mobile phone number, street address or e-mail under the dedicated fields but for this example we will search by name.
As stated above you use the blue line when searching. Enter the entire name or parts of it. We fill in 'John' in the first name field but as we are not sure how to spell 'Moxley' we will only enter part of the name 'mo'.

And hit 'Enter' or click on to see the result(s).

Mark the appropriate line (in this case 'John Moxley') by clicking anywhere on that line in order to mark it with the dark blue frame.

Click on the  button in order to open up the Person page with John Moxley in focus.
Shortcut for finding a person (or an activity)

Directly under Person or Activity you can doubleclick on the hash tag and type in the customer number directly in the field that opens.
Hit Enter and you get the person in focus.
Go to .
Click on  if you want an activity similar to the one you have in focus (this is the easiest way to do it if you have redundant data like the same name or start date).
Else click on 
Enter information in the relevant fields.

- No.: (#) is filled in by the system.
- Activity: Enter the name of the activity.
- Activity Group: Choose the group this activity belongs to.
- Start Date: Choose the activity's first day via the calendar.
- End Date: Choose the activity's last day via the calendar.
- Info Date: is usually left empty. Can be used for scheduling information meetings or the like.
- Website Start: The starting date for exposing the activity online.
- Website End: The ending date for taking the activity offline.
- Min. Particip.: Does not block anything. Used for stating the least amount of participants in order to go through with the activity.
- Max. Particip.: Blocks any registration over this amount. State how many participants you want when the activity is full. Registrations over this amount is automatically moved to the waiting list.
- Timetable: Makes the activity available in your Timetable, Star Tracker and participants accounts.
- Online only WL: Online registrations are only possible to wait list even if there are available spaces.
- Age flexible: Leave blank. If ticked it breaks the minimum/maximum age stated either below or in the corresponding group.
- Perpetual Exclude: The activity will be excluded from your perpetual run.
- Min. age: Usually left blank as this is set via the group. If filled in it overrides the group settings and sets the minimum age for participants in this particular activity.
- Max. age: Usually left blank as this is set via the group. If filled in it overrides the group settings and sets the maximum age for participants in this particular activity.
- Price: Set the total price for the activity. This amount is automatically brought forward to the participants invoice.
- Price per lesson: Only for perpetual run. Sets the next activities price based on number of lessons.
- Schedule: Is filled in by the system according to the timeslots you register later.
- Remark: Here you can put in comments regarding this specific activity. Does not show up anywhere else.
- Web info: Shows up in your online booking. We suggest you primarily use this under the corresponding group!
- Invoice info: Shows up in the invoice information sent to participants. We suggest you primarily use this under the corresponding group!
Click  (or
(or  if you do not want to register it anyway).
Now you want to assign timeslots, area and instructor to this course.
1) Assign timeslots
Click on
A pop-up opens

Here you choose 'Day' if you want the activity to run everyday between the start date and end date.
In the example we click on 'Week' in order to make a weekly schedule.
A new window is shown

The first field indicates if the activity runs every week ('1'), every other week ('2') and so on.
The start time for the lesson is filled in (24-hour format exactly as shown unless stated otherwise!) and the same for the end time.
'On days' (shown 'Friday' in the above example) you choose one or more days a week where you want the class to be repeatet.
Click  , you get a confirmation, close the window by clicking on

Go back to KeepTrack where the timeslots show up in the lower frame.
2) Assign area(s)
Click on  in the left menu and then on

Choose the relevant area and click  . Click 'OK' to close the window.
Note: You can add more than one area if you need to!
3) Assign instructor(s)
Click on and then on

Choose the 'Instructor' and the 'Instructor Type' and click on  . Click 'OK' to close the window.
Note: You can add more than one instructor if you need to!
You are all set!
If you want to search for information in KeepTrack that isn't directly searchable the easy trick is to use your browsers search function:
- Find the page you wish to search for information.
- Click Ctrl+f or Cmd+f ('Find' to remember it) on your keyboard.
- Write what you want to search for.
On a day to day and activity to activity basis the absolute easiest way is to use your Star Tracker. See description in separate FAQ.
If you need to enter or alter attendance on several activities or several participants there are two ways to do this:
Attendance through activities
- Choose in the top menu.
- Find the activity you need to handle.
- Choose
 in the lower left menu.
 - Choose
 to open the attendance function.
 - Choose the relevant lesson/class in the dropdown menu and tick who was present.

Attendance through person
- Choose in the top menu.
- Find the person you need to handle.
- Choose in the lower left menu (shown by default).
- Choose to open the attendance function.
- Choose the relevant activity/class in the dropdown menu and tick when he or she was present.

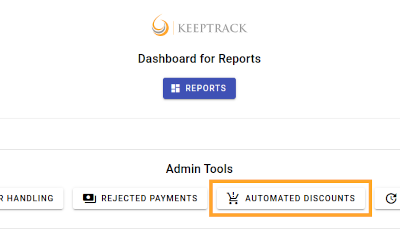
Automated discounts
Please note that this is viable everywhere (super-user and online booking)
Your company can have several discounts automated. You need to contact Support to get started. All these discounts are fully automated and given regardless if they are registered by a super-user or by self-service via your online booking.
Late registration discount
If you want to automate the discount for customers signing up after the activity has started you can set this directly under where you tick the box 'Discount late reg.'
This discount is calculated as a fraction of the total lessons. Ie if there are 10 lessons in total and you sign up after 3 lessons have past you get 30% discount.
'Multiple' discount
This is setup via Support and covers only the groups you want to use this for. Participants with multiple registrations running in the same period will get a discount on additional registrations. You can set discounts like '1st registration 0%, 2nd registration 10%, 3rd registration 20%' and any variation of that.
'Siblings' discount
This is setup via Support and covers only the groups you want to use this for. Participants with the same payer are regarded as siblings. The payer does not count as a customer and does not receive any discount when the payer is also the customer. You can set discounts like '1st sibling 0%, 2nd sibling 10%, 3rd sibling 20%' and any variation of that.
'Family' discount
This is setup via Support and covers only the groups you want to use this for. The payer gets a discount for each additional registration within the same period and you can set discounts like '1st registration 0%, 2nd registration 10%, 3rd registration 20%' and any variation of that.
Employee discount
This is setup via Support and gives persons marked as 'Employee' the discount you want (ie X% or X$).
Membership discount
This is setup via Support and only works if you have membership activated. The payer gets a discount for each additional registration on membership within the same period. You can set discounts like '1st registration 0%, 2nd registration 10%, 3rd registration 20%' and any variation of that.
'Code' discount
This is found in your Dashboard along with a thorough description
Add specific discounts to specific persons, facilities or groups. The person(s) you register must already be registered as customers. Discounts set on facilities and/groups will be available to available and new customers alike.
Manual discounts
Please note that this is only available in your super-user account
This will give the person the noted discount on this particular registration only.
It will not affect other registrations, registrations done via perpetual roll-over or online booking!
Under you have two additional ways of registering discount for a customer.
In the lower frame on the same row as the registration you can register discount or even change the suggested price or add a fee on an individual registration.

If we go left to right in the above screendump:
Price: is the suggested price brought over from the activity. You can change this for individual customers if you need to. We recommend that you use the discount instead though.
Disc. Amount: is the amount of money you want to deduct from this particular invoice. Simply fill in the amount. Note: You can fill in amount or %.
Disc. %: is the percentage you want to deduct from this particular invoice. Simply fill in the percentage. Note: You can fill in amount or %.
Fee: is used for adding a fee to this particular invoice.
All the different amounts will show up on the invoice when they are not empty.

If you see this error it is due to the attempt of registering/changing a person with data that is already registered under an existing person. This is controlled for e-mail, mobile no. and social security no. (Therefore you are still able to find or register doubles if the aforementioned data is not present!)
This even controls your users login on your online booking.
The blocking of doubles with the same mobile no., social security no. or e-mail is enforced to avoid the same person/family to be present more than once in your database!
Go to
Find the activity you want to change (in this example activity no. 18357).

'Instructor Handling' in the Dashboard
You can easily handle instructors in the Dashboard under 'Instructor Handling'. See more in this FAQ 'How do I make daily changes to instructors' schedules when staff is sick and the like?'
Change one or a few instances AND keep the history
This is the preferred method as you'll keep all HR information regarding Sickness, days off and so forth.
Click on in the lower left menu.
- Click on the instructor for the lesson you want to change (in this example 'Adam').
- Leave the name as is
- Change the instructor type
- Click outside the dark blue line.
- Insert a new instructor (in this example 'Alice') on a new line as stand-in or the relevant type

That is it! Repeat the steps for every lesson you wish to change.
Change one or a few instances if you don't want the history
This might be used when you're still planning the schedule or the like.
Click on in the lower left menu.
- Click on the instructor for the lesson you want to change (in this example 'Adam').
- In the dropdown choose the new instructor by clicking on him/her (in this example 'Alice').
- Change the type
- Click outside the dark blue line.

That is it! Repeat the steps for every lesson you wish to change.
Switch instructor on all lessons
If you wish to switch the instructor on all lessons you can easily do this by deleting all instances and add a new instructor
Delete all

Add to all

You can restrict access to activities by utilizing the minimum and/or maximum age found under or 
We recommend that you use the settings under as this affects all activities under this group which means you only have to do this once.
You are then able to adjust single activities, when needed, directly under
The procedure for this is the same for Group and for Activity.

Fill in one or both of the fields. Remember it might be a good idea with a certain degree of flexibility in order not to be too rigid on your customers.
Please note that the age is calculated based on the individual activity's start date!

Age Flexible
If you need to make an exception in just one specific activity we recommend that you do not change the age under but instead tick 'Age flexible'. That way super-users can manually enter participants outside of the age span but you do not alter the set restrictions in your online booking.


Go to as shown above.
If you register an adult payer and a child you start with the payer (parent). That way you will save a few clicks.
- Click
- Insert all relevant data for the payer ('Member date' is prefilled with 'Now' and will thus be registered with todays date).
- If you use online registration and/or receipts by e-mail you must fill in a valid e-mail and tick 'Email invoice'!
- When all info is in you click the button (you can even hit 'Enter' on your keyboard to save the data).
If this person was also the participant (ie adult activities) you go directly to 'How do I register a customer for an activity?' in its own FAQ. If the participant is a child you continue below.
- To register the child click if you have the payer in focus (or if you do not).
- Fill all relevant data for the child. You must have a valid birthdate in order to register the child on activities with age restrictions!
- You do not need to fill in address, e-mail, phone and the like as that is already registered under the payer.
- In the field 'Payer' you either fill in the customer ID for the payer or you simply start entering the name in order for KeepTrack to search for him/her. You can even click
 and perform a full search.
 - If you need to link the child to an additional person you fill in the 'Contact' field with this persons ID or name.
- When all info is in you click (you can even hit 'Enter' to save the data).
Register on activity
Next register the participant for an activity. Go to 'How do I register a customer for an activity?' in its own FAQ.
Register customer on activity
- First look up the participant under by either customer ID or by searching.
- Next under fill in the line shown here.

- 'Customer', 'Payer' and 'Reg. date' (registration date) is prefilled.
- Choose the activity by clicking to the right of the 'Activity' field which opens 'Find Course'. Find and click on the activity you want. This automatically fills in 'Price' and the 'Activity' field.
- Fill in the desired fields 'Reg. method' 'Disc. Amount' (subtracts this amount from the total price), 'Disc. %' (subtracts this percentage from the price), 'Fee' (adds this amount to the price), 'Remark'.
- Hit 'Enter' on your keyboard or click outside of the dark blue frame to update the registration.
- NOTE: If the activity is full the 'Reg. date' automatically switches to the 'Waiting List Date' and the person is not registered for this activity. KeepTrack gives you a warning when this happens.
If the customer registers after the activity started
If the activity already started (or the customer is allowed to sign up later after the activity start date) you should set the 'Start reg time' as todays date (you can just punch in 'now') in order to reflect the actual start time for the customer and possibly adjust the price.
Leave the 'End reg time' empty.

Remember to get paid!
On the row containing the new registration you either click ![]() for e-mail or paper invoice to the customer. (Note: If you choose to let the customer pay cash or with a credit card not linked to KeepTrack you will have to register the payment under
for e-mail or paper invoice to the customer. (Note: If you choose to let the customer pay cash or with a credit card not linked to KeepTrack you will have to register the payment under  in order to avoid wrongfully billing the customer again.)
Or you click for point-of-sale with the customers choice of payment option on file. Via POS a receipt is automatically mailed to the customer (and the payment is automatically registered under 'Payment').
The activity hasn't started yet
We recommend that you make a special activity for un-registered customers (with max 0 particpants to ensure everybody is on waitlist) in order to be able to follow up with marketing and the like and simply switch the registration to this activity (but on waitlist!).
Or you can just delete the registration (note that this also deletes the invoice and you have no history).
The activity has already started
Set the 'End reg time' according to your terms (today, the end of the month or...) and adjust the price accordingly.
This will also ensure that this registration doesn't roll-over to the next term in any of the automation.

You have a customer already registered in one activity/class who wants to switch to a different activity.
Switch before the activity has started
Go to and look up the customer. Make sure you are in in the lower frame.

In the row with the activity you want to switch click on the marked button ![]() in order to bring up the 'Find course' window.
in order to bring up the 'Find course' window.

In the 'Find course' window you find the new activity and click on it in order to "bring it back" to the main window. It's a good idea to check that the price is correct and to send the new invoice to the customer.
Make sure that you have filled in all relevant fields (we advise you to take a note in the 'Remark' field about which activity the customer came from) such as price and discount.

When you have filled in all relevant data hit 'Enter' or click outside the dark blue row.
The customer has now switched to the new activity and any payments registered on the old activity is still registered under the new activity.
It's a good idea to check that the price is correct and to send the new invoice to the customer.
Switch after the activity has started
If the activity already started you should first end the present activity by setting 'End reg time' to 'now' (automatically inserts today's date and time) and update the registration (if you have activated 'Late reg discount' remember to set the full price again).

Then you register the participant on the new activity, set the 'Start reg time' to 'now', update the row, set the price to 0 or set discount=100% (or set the price accordingly) and send the new confirmation/invoice to the customer.

This shows the terminated registration (middle row No 10198) with the previous price and the new registration (bottom row No 10223) with price set to 0 (zero).

It's easy to copy all or some of the participants on one activity to another. This is handy when you want to register participants to the next term or register participants from many activities to one event or many other scenarios you can think of.
The activities you want to copy to have to be made before you start.
First of all the easiest way of doing this (especially if you have many activities) is to prepare before you start. You can do this by making a list of all the activity numbers you want to copy from and then note the corresponding activity number of the activity you want to copy to at each of them.
Go to and click on  to start the function
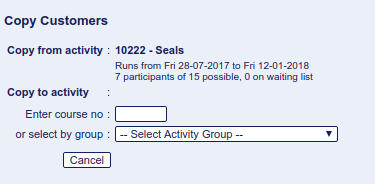
Here you see details on the activity you're copying from. You have the option of choosing the "to" activity via the drop-down menus but the easiest and fastest way is by entering the number of the "to" activity directly and hit Enter.
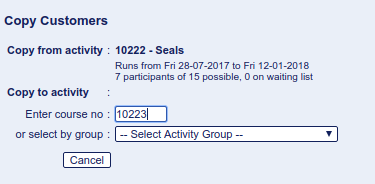
This gives you details of the "to" activity and a list of all the participants you can copy with their preset status suggestion on the "to" activity. You can manually choose 'Registered' 'Waiting List' or 'Do not copy' for each person.
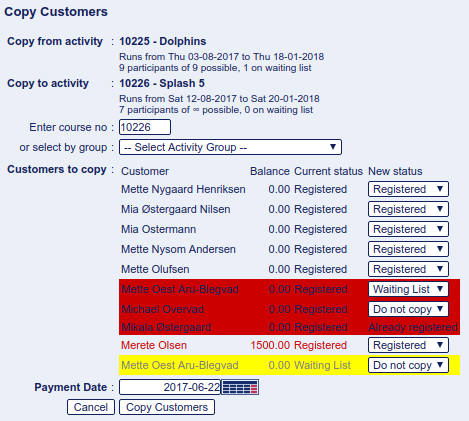
- The list will start with everybody set to 'Registered' unless there are too few available slots which causes the rest of the list to be set to "Waiting List".
- Participants with outstanding balance are shown in red text.
- Participants with a credit are shown in green text.
- Participants not marked for 'Registered' are marked with red background
- Participants already registered on the "to" activity are marked with read background and are not copied
- Participants with 'End reg. time' set with a date before the new course start date will automatically be marked in yellow and 'Do not copy'
- Participants who do not meet the age criteria will automatically be marked in yellow and 'Do not copy'
Choose the participants to copy, set the 'Payment Date' for all the registrations and click 'Copy Customers'
Please note on prerequisites
If there are prerequisites on the "to" activity and these are not met this is not considered and participants are copied over
Go to
In the left menu click
Click the drop down menu under 'Reg. No' in the 'New' row as shown here.

- Choose the appropriate invoice (usually the one with an outstanding balance) by clicking on it.
- Fill in at least 'Payment Date' (fill in "now" for todays date) and 'Amount' on the same line and hit Enter on your keyboard. (You can even insert a comment concerning this particular payment before or after you hit Enter.)
- The payment is now registered!
Hint!
Please be careful not to click outside the dark blue area before all information is entered as this will try to update with a resulting error due to insufficient data in one or more fields!
Nothing "bad" will happen by doing this but you will have to start over again ;)
The finished result when payment is done in full. Note that you can register any amount and even several amounts on the same invoice.

Yes you can add reminders fees
Under 'Person' you can manually set the fee for a specific reminder/invoice.
And/or you can let KeepTrack support know the size of your standard fee and you will be able to add the fee for all reminders when you send them under 'Admin' 'Email invoice' where you tick 'Add fee'.

When you have to register a refund or an amount you have returned because the customer has paid too much (or he did not receive the discount he was entitled to when paying in the first place) you basically follow the FAQ "How do I register a payment from a customer?" but when you enter the (negative) amount you enter a minus sign in front of it (i.e. '-219.50'). This will deduct the amount from what ever amount is outstanding in the invoice.
Start-up and Other Global Settings
Get going with the setup and administrative tasks of your KeepTrack tools
This is the procedure for ADMINS to add and remove Dashboard user accounts.
Login and go to the Admin Tool 'User Accounts'
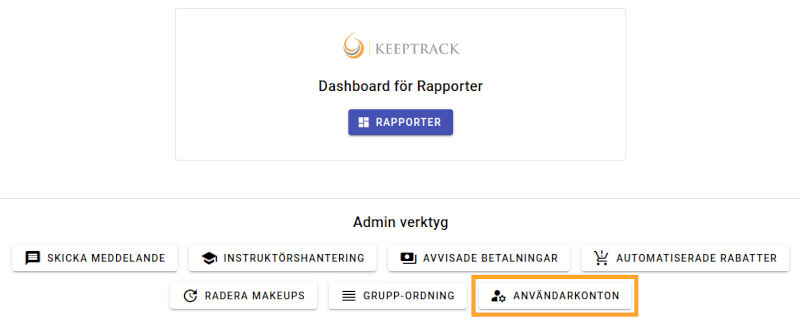
When you open this tool you will see a list of all your employees who are eligible for a Dashboard account.

✋ Note that a person needs several things in order to be able to get an account (and thus be on the above list):
- Be registered in your database
- Have an email registered
- Be registered as employee
- Have initials registered
Without this information you cannot give them a Dashboard account.
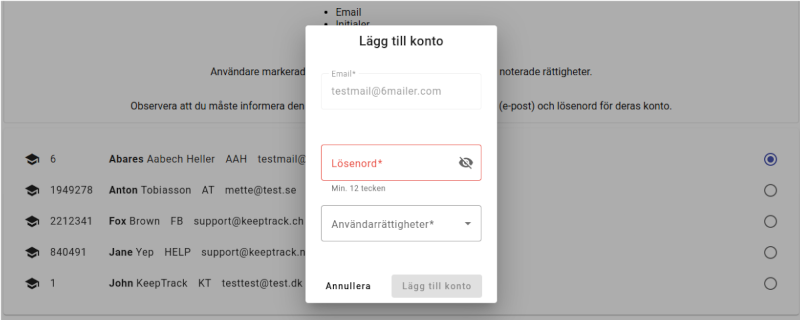
When you click a user you can add their account by inserting a password of min. 12 characters and choosing the rights they need.
For an overview of user rights please see the FAQ on this topic.
If you select a user who already have an account you can delete the account. (Use this if you make a mistake when registering accounts.)
Remember to inform your users
Remember to inform the users of their new credentials, including their password.
On your online booking you have a contact form for your customers and visitors. This can be filled in and sent by anyone even without being logged in.

Challenges with spam?
In case you receive spam from this form please note the following
- To fight spam is always a trade off between minimizing spam and making it easy for your customers to use your services. KeepTrack has always prioritized the latter.
- The spam you receive from this form is sent by real people (who probably work with this for a living).
- Most major mail services like Gmail or Microsoft are able to filter about 90 to 99% of this spam without blocking the genuine messages from your customers.
Go to https://keeptrack.dk and login with the credentials you were given from KeepTrack Support or your administrator.
Super-user account (keeptrack.dk)
When you login to your super-user account, the first thing you will see is the 'Person' page which we explain in detail further down. The exact content varies in accordance with your account rights.

Top menu
The top menu is where you choose what topic you want to work with. Short description:
Here you handle customers, payers, instructors and all other persons.
Here you handle all your different activities like lessons, workshops, camps and the like.
Here you handle the overall division of your activities ie 'Swim school Level 1' and 'Summer Camp'.
Here you handle the exact areas where your activities are taking place.
 Here you handle the overall division of your areas. Ie the building or address where your business is taking place/where your customers or members go.
This button takes you to the different kinds of reports available for your business.
Only available to administrators.
 Actively logs you out and terminates your session.
 Brings you to the FAQ :-)
 Indicates with red movement when the server is active.
 Here you can toggle between the available languages. TRICK: When you toggle this you force an update of the system including drop-down menus.
Left menu
The left menu is described in an FAQ of its own.
Dashboard account (keeptrack.dk/db)
When you login to your Dashboard account you start on the overview/login page. What you see here is dependent on your user rights.
Menu and Admin Tools
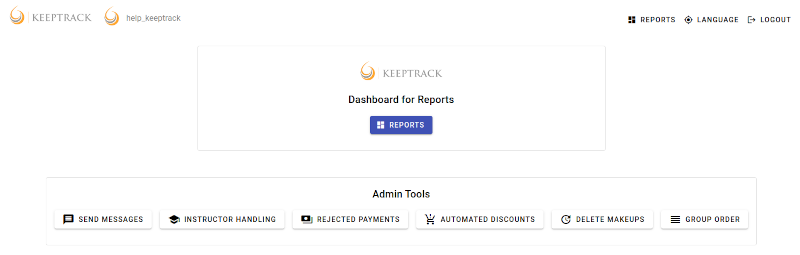
At the top you find the menu, where the top-left KeepTrack logo is a link back to this page.
If you have a trust account or higher you will even find the Admin Tools
- 'Send Messages' is a powerful and innovative tool for blasting SMS
- 'Instructor Handling' is a visual tool for handling changes to your instructor/staff schedules
- 'Rejected Payments' gives you an overview of the latest rejected payments (only visible with an attached QuickPay account)
- 'Automated Discounts' is where you find and set your discounts
- 'Delete Makeups' here you can delete individual persons makeups after a set date
- 'Group Order' is where you set the order of your groups for your online booking schedule
Key Figures

Next you find the Key Figures, with an easy overview of the latest registered payment, email use, and SMS use (the latter only when you have an unlimited SMS account)
Visual data overview
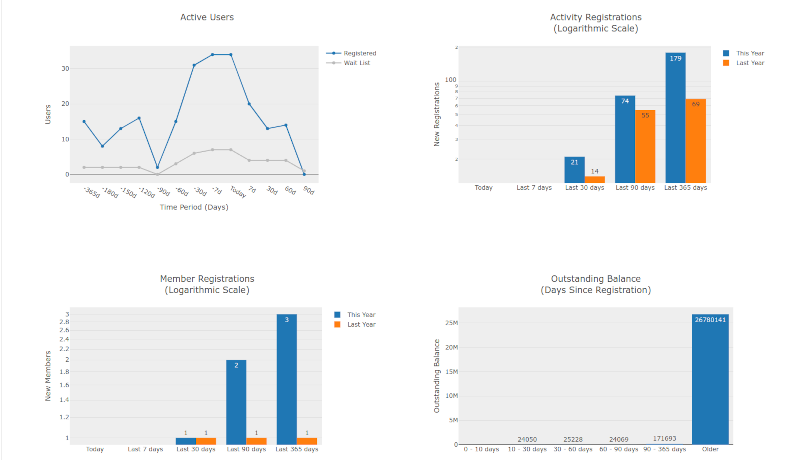
Lastly you see the graphs, showing current data for your business
- 'Active Users' shows the number of registered persons at a given date, a year back in time and three months forward
- 'Activety Registrations' shows the number of registrations done on your activities at a given time period this year, compared to the same period the year before
- 'Member Registrations' shows the number of persons who has registered an account at a given time period this year, compared to the same period the year before
- 'Outstanding Balance' shows what your customers owe you (or you owe your customers, if negative)
Perpetual activities are activities running periodically on a monthly, quarterly or semiannually basis.
- Monthly: Target (the period being populated during the run) is every month from the 1st to the last of the month.
- Quarterly: Target is every quarter. First quarter = January 1st to March 31st. Second quarter = April 1st to June 30th. Third quarter = July 1st to September 30th. Fourth quarter = October 1st to December 31st.
- Semiannually: Target is January 1st to June 30th and July 1st to December 31st respectively.
Perpetual activities are fully automated
If you in any way have perpetual activities or just roll over your schedule from one period to another we strongly advise you to implement this feature as it frees up a lot of resources and makes your scheduling fast and error free.
All participants enrolled in a perpetual activity will be registered on the upcoming schedules activity accordingly.
Moving participants around between different activities or levels will have to be done manually.
In order to get the feature going most of the work is done up front and one time only. Here are the headlines for the feature setup.
- Contact Support to initiate the underlying settings
- Setup your closing days important!
- Choose the groups to include
- Set lesson based prices (optional)
- Exclude individual activities (optional)
- Exclude time slots with arbitrary data
- That's it - Let the cloud take over
Mandatory steps
1. Contact support to start the feature
Support will open up the perpetual roll over and you are good to go.
These are the main settings
Support will set these based on information from you
- PERPETUAL_ACTIVE ➡ Activates your perpetual features
- PERPETUAL_INSTRUCTOR_TYPE_PRIORITY ➡ Controls the instructor types you want included and the priority they are handled in. The default is 'main, supervisor, stand-by, assistant, office, on-deck' and means instructors with these types are included and that an instructor with different types on different lessons will get the 'highest' type in the new schedule.
- PERPETUAL_RUN_DAYS_BEFORE_START ➡ This sets when the roll-over runs. It is calculated in days before the new term start date. Note that it sets days based on the first of the month, quarter or 6-month period - Not the actual schedule start date which can be different based on your closing days.
- PERPETUAL_RUN_MONTH_DAY ➡ Adjusts the above setting to a specific day of the month. Ie PERPETUAL_RUN_DAYS_BEFORE_START should just be within the desired month and this will set it to the specified date
- PERPETUAL_OFFSET_WEB_ENABLED_START_DATE ➡ Sets the individual date for opening the activities to the public online. Number of days after the roll-over execution date
- PERPETUAL_WEB_START_LAST_SEASON_WEB_END ➡ This overrides the above setting and sets the new activity WEB_ENABLED_START_DATE = The old corresponding activity WEB_ENABLED_END_DATE. In other words the new activity will go online when the old activity goes offline.
- PERPETUAL_REG_PAYMENT_DATE_DAYS_OFFSET ➡ Sets the payment date to number of days before the activity start date
- PERPETUAL_REG_PAYMENT_DATE_MONTH_DAY ➡ Adjusts the above setting to a specific day of the month. Ie PERPETUAL_REG_PAYMENT_DATE_DAYS_OFFSET should just be within the desired month and this will set it to the specified date
- PERPETUAL_INCLUDE_REGISTERED_PARTICIPANTS ➡ Whether or not you want participants to roll over to the new activities
- PERPETUAL_INCLUDE_WAITLIST_PARTICIPANTS ➡ Whether or not you want people on wait list to roll over to the new activities
- AUTO_REG_FUTURE_PERPETUAL_COURSE ➡ will auto register people on future corresponding activities when registering said person on an activity with connected future activities. Default = FALSE
2. Register your closing days
This is very important in order to avoid setting yourself up for a lot of manual corrections.
You should register all closed days in your facilities as such. This means that you not only setup the regular Holidays but even the periods where your business is closed for Summer, Christmas or the like. These are examples of closing days you should register (Remember: Closing days can be individual per facility.)
- Country specific Holidays
- Individual days where your business is closed
- Summer leave, Christmas leave and such
Especially the last example is important to remember: If you are running a monthly perpetual schedule and you are closed say during parts of or the entire month of July you register the exact and entire period as closing days. If you don't you will have activities and lessons running during this period and you will have to correct this manually.
Note: Closing days without set facility will exclude lessons for all facilities during set period AND closing days with set facility will exclude lessons for that facility only during set period.
Pay close attention to this when registering your closing days.
3. Mark included groups
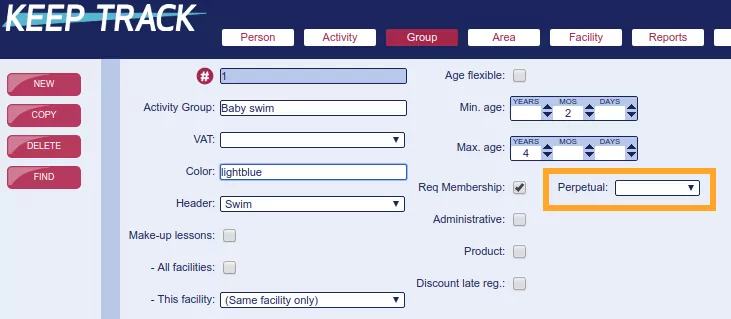
If you want activities to roll over in your perpetual schedule you have to mark the entire group for 'Perpetual'. You choose either 'Monthly', 'Quarterly' or 'Semiannually'.
If your activities run from 7th of August to 20th of December you choose 'Semiannually' and adjust the start and end date respectively by registering the corresponding closing days. The same goes for schedules corresponding to Monthly and Quarterly.
That's all the mandatory steps you have to take in order to get your perpetual schedule rolling. But read on as some of the below steps are needed to register your everyday updates to the schedule like change of instructor and such.
Steps needed for adjusting the schedule
These settings adjust the upcoming perpetual roll-over and has to be registered if you want changes in the next schedule.
4. If you have lesson based prices
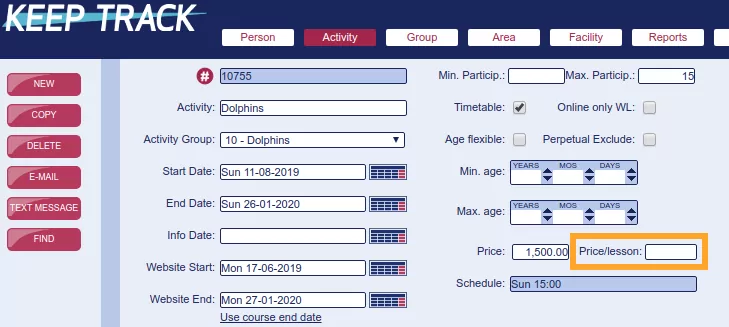
If all or some of your activities have pricing based on the number of lessons in a term you can set that directly on the respective activities.
(Remember: This is easily done via 'Activities' 'Find')You should not alter your activity price if you set the 'Price/lesson'! The 'Price/lesson' field is only active on the perpetual roll-over and will automatically adjust the price for the "new" activity.
5. Exclude individual activities
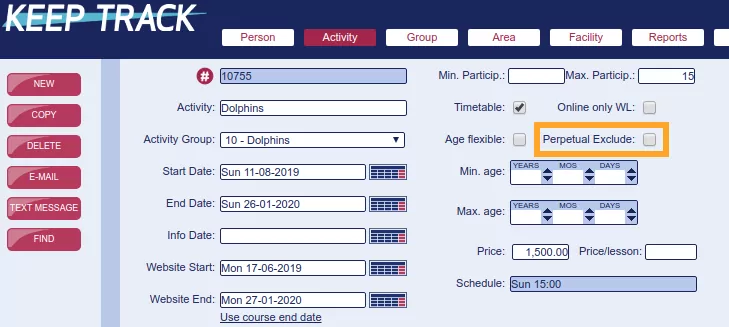
If you have certain activities you do not wish to roll-over to the next schedule you simply mark that/those activities 'Perpetual Exclude'. This leaves the activity and enrolled participants out of the upcoming perpetual roll-over.
6. Exclude specific timeslots
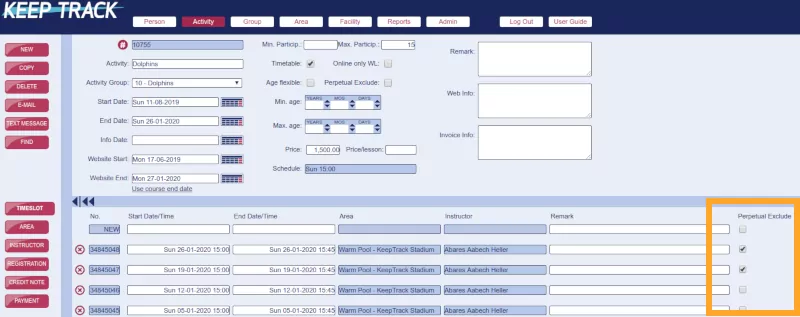
When you check the 'Perpetual Exclude' on a timeslot it will exclude this area, instructor and timeslot if they are different from included timeslots.
It is very important to mark timeslots with data you do not want in the upcoming perpetual schedule. You would typically mark timeslots with the following data to avoid getting them in the upcoming roll-over:
- An extra timeslot with a different time
- A timeslot which you have placed in another area than usual
- Timeslots with an instructor who is not continuing in the next term (in other words: When you have switched the main instructor from one instructor to another)
- It is not necessary to mark timeslots with changes where the instructor type is outside of the list under bullet point 1
Please note that new activities have all timeslots unchecked and that timeslots where you alter instructor, area or other data will be checked as excluded. You can always override this by checking/unchecking manually.
Please note what is included
Example of monthly perpetual schedule
- You are running an activity with one weekly timeslot every Monday 4 to 5pm
- The current schedule has 4 timeslots (4 Mondays that month)
- The upcoming schedule will have 5 timeslots (5 Mondays that month)
- You mark the first and the second timeslots as 'Perpetual Exclude' due to stand-in instructor (or any other reason)
- As the times on all timeslots are the same the upcoming schedule will of course have 5 timeslots (every Monday 4 to 5pm)
- All the areas and instructors on unchecked timeslots will be rolled over to every timeslot on the upcoming schedule according to rules set
Ie. You have 3 timeslots with Mary as instructor and 1 timeslot with John as instructor.
If you do not exclude any timeslots: Mary and John will both be set as instructors on all timeslots on the new schedule. (Note that if John has an instructor type set which is not included in the roll over - Typically 'Sick' or 'Absent' - Only Mary will be set as instructor even if Johns timeslot is not excluded.)
If you do exclude the timeslot with John, only Mary will be set as instructor on all timeslots on the new schedule
If you do exclude the timeslot with John and one or two of the timeslots with Mary, Mary will still be set as instructor on all timeslots on the new schedule.
If you exclude all timeslots you will have no timeslots, and thus no instructor or area, on the new schedule.
Automated registration on following perpetual activities
This is only relevant for perpetual activities and needs to be activated via Support.
- Scope: You want people who sign up to continue on your activities.
- Status: You have the schedule for May online AND you have the schedule for June online.
- Situation without the feature: You sign a person up for a May activity but he is not signed up for June. You have to catch this manually.
- Situation with the feature: You sign a person up for a May activity and he is automatically signed up for the corresponding June activity on the same invoice if the corresponding activity is within the same group.
Note that this is available for both the super-user interface and for the online booking.
Automated registration 'not working'
In some cases you will experience that the user is not automatically signed up for the upcoming activity/activities.
- If you manually change the upcoming activity to a different group the user is NOT signed up
- When you manually register a new activity, that has not yet been picked up by the perpetual automation the user is NOT signed up. Ie if you manually add March, a user who signs up for March will not be signed up for April. The automation will kick in with registrations from April.
To stop or pause perpetual temporarily
If you want to pause your perpetual runs, like for instance skip a term for one reason or another, there are certain things to be aware of.
It is never a good idea to switch off perpetual completely (via Support) once it's on.
Instead follow the procedure below to pause your perpetual runs.
Pause perpetual runs
Go to 'Group' 'Find' and clear all the perpetual settings. It can be easily done in 20-30 seconds.
That way you can decide when to activate it again just by flicking the perpetual groups on again and it picks up where you left off. So if you just want to skip a term and continue at a later time with the current schedule you just follow the same procedure to activate the groups again at any time before the perpetual run you want active. And that is all there is to it.
Extra steps for new schedule
The above procedure alone could give you problems once you start again if you are going to make a new schedule 'on top of' the existing perpetual schedule.
Therefore after you alter the group settings as mentioned above it is imperative you also set ALL activities from this term to 'Perpetual exclude'. This is also fairly easily done in one go via 'Activity' 'Find'.
By doing this (and technically keeping the perpetual running) it will automatically pick up the new schedule on the run
once you turn it on again. The upcoming run (the run you want to skip) should then be empty.
Don't add new activities until after the upcoming run though!
Beware of your timing
Please note that it is important to mind the timing. So you should make all 'stopping' steps before the perpetual run you want to skip and wait with entering new activities until after the perpetual run you want to skip.
(Technically you can make everything before the run you want to skip but then you have to mark all the new activities with 'Perpetual exclude' before the run you want to skip and unmark them again before the next run you want to go through with.)
Examples
If we take a monthly perpetual run with the following criteria as an example.
- PERPETUAL_RUN_DAYS_BEFORE_START = 75
- We are on the 6th of May
- July has been registered (was run 14th of April)
- The month copied was June
- Next target date is 1st of August
- Next run is on the 14th of May and will copy July to August
The perpetual run always has a target date. This date is the first of the month on the first month it has not run (so per default there will never be a perpetual run on a month that already has data from a previous run).
This means that in our example the next run will be for August no matter the settings.
Regarding the data to be copied, that is always the latest registered data from the latest update so depending on your settings and adjustments this can basically be anything. In this case it would be July.
Now we change the settings for the above example:
We move the run date backward one month (PERPETUAL_RUN_DAYS_BEFORE_START = 105)
We would still have target date August 1st
We would now have the next run date (for August) as 14th of April
On the next perpetual update (every morning around 06.00 CET) it would 'see' that we have passed the run date and thus perform this run and immediately copy July to August (this might not have been the intention - Maybe you wanted to skip a month! See the below box.).
Avoid the previous run when pushing run date backward
Target period is still August but we do not want to register that as business is closed during August.
Instead we want to register September (still copied from July).
IMPORTANT: CONTACT SUPPORT AND HAVE THEM REGISTER AUGUST AS ALREADY RUN AND CHANGE THE SETTING TO 105!
This will make the run execute on 14th of May and copy July to September.
We move the run date forward again one month (PERPETUAL_RUN_DAYS_BEFORE_START = 75)
We would have target date October 1st
We would now have the next run date (for October) as 14th of July
There would be no run prior to this date.
14th of July would copy the last data (August) to October.
Skip a 'copy' month when pushing run date forward
In this example we have previously let the perpetual runner register September copied from July. Since Auguste had no schedule we do not want to copy from August.
Target period is still October.
We want to skip copying from August and instead copy from the latest September schedule (and still register October).
IMPORTANT: CONTACT SUPPORT AND HAVE THEM REGISTER AUGUST AS ALREADY COPIED AND CHANGE THE SETTING TO 75!
This will make the run execute on 14th of July and copy September to October.
The next target period will 'repeat' the same period to copy October to November on 14th of August.
When you plan internal courses, education, parties or the like you can easily handle invites, online or offline registrations, attendance, salaries and more via KeepTrack.
This is a one time setup
- Register one single qualification called something like ‘Qualified For Internal Workshops’ or the like

- Register this qualification on all active staff members (remember to handle this when staff is hired or leaving)

- Register one group for internal activities: 'Staff Activities' or the like
- Register the above qualification as a prerequisite on the group

The prerequisite blocks registration to only include approved staff and you can now even open up the activities for online booking where customers can see the activities but only staff can register.
You can even register multiple qualifications if you need to split the staff into groups of different rights like 'Education', 'Conference' and the like.
Activities without salary
If the activity is non-paid (ie a party) you handle it like any other activity.
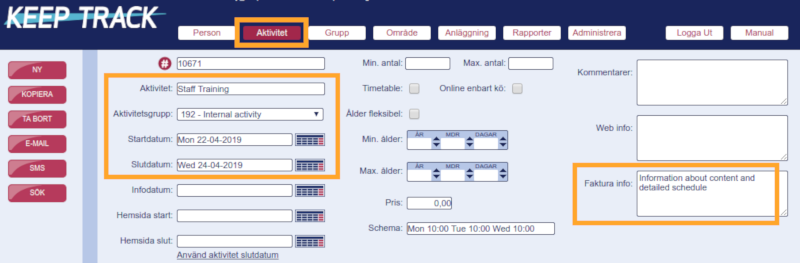
- Make a new activity
- Choose the internal staff group
- Set start and end date
- Set the price to zero (if it's free!)
- Set the max participant limit if applicable
- Register the timeslot with time, place and even responsible 'instructor' if applicable
- Insert all relevant information in 'invoice info'
- Register all relevant staff as participants
- Send the invitation as a regular invoice with all relevant information included. You can even use the e-mail function with dedicated attached PDF
- (alternatively you can place the activity on your online booking and let staff sign up via this)
- Open the activity on your online booking and let staff cancel the 'lesson' via 'My Bookings'. Note that this works just as well for a weekend event where staff can cancel one day and participate the other
- All information can be communicated directly on this activity via e-mail or text
- At the actual event you can take attendance as usual and also use the timetable
Paid activities

- Register the activity like described above...
- Register all staff members as instructors with the relevant instructor type (this places the event in the 'My Plan' for all staff)
- Send invitation via e-mail
- If a staff member cancels you move their registration to wait list
- Adjust instructor types according to reality on the actual event ('Absent' and so forth)
Note that you now have all salary information readily at hand from the registered instructor type!
(Free) activities with customers
- If you run master classes or the like, where you need 'regular' participants like families, you handle these activities as regular activities open for participants to book online.
- Staff is then handled like instructors no matter whether the event is paid or not. Salary is controlled via the instructor type
Via the Dashboard 'Reports' 'HR' you'll find the report 'Salaries' where you are presented with working hours in detail and sum for the chosen period for all individual employees. Just choose a given period, click 'Get report' and you have the information needed for salaries.
Please read the report description before downloading the report.

If you have several different sports
...your customers can sort these in the online schedule


The schedule page shows 'All sports' by default
How do I start?
- Contact support in order to open the feature
- Contact support with the list of options for the drop-down (optional). If you use several languages we recommend you use your main language for these options
- Go to 'Group' and set the 'Header' to the desired choice as shown below. All activities under the group will take this setting

What is visible in the drop down menu?
Please note that only relevant choices are shown to the customer. So even if you have 5 different choices the drop-down will only show the relevant choices from exposed groups. That way you never present empty choices for your customers.
Also note that activities without any header are always shown in spite of chosen filter. This ensures that for instance your products are shown on all schedules
Sale of products/merchandise via your online booking
You can set a group to handle products instead of activities. That way you can sell all 'activities' under this group as products like swim suits, vouchers and so forth.
Product group settings
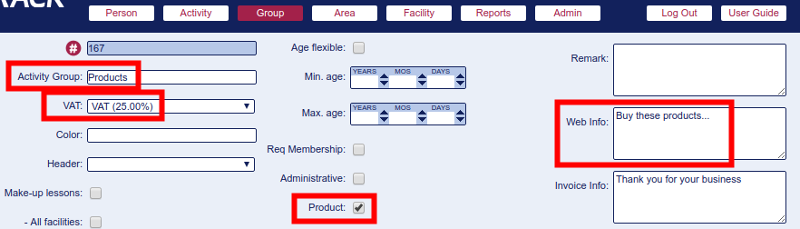
- Fill in the name (Header button in your online booking)
- Choose VAT
- Tick the 'Product' box
- Fill in 'Web info' (this is explanatory text for your users in your online booking)
- Fill in 'Invoice info' (this is further detailed text for your buyers in their invoice)
When you have registered this group for products (ticked the 'Product' box) all "activities" under this group can be booked several times. This is necessary if somebody wants to by more than one item of the same product ;)
Then you register an 'Activity' for each product and expose it in your online schedule as usual.
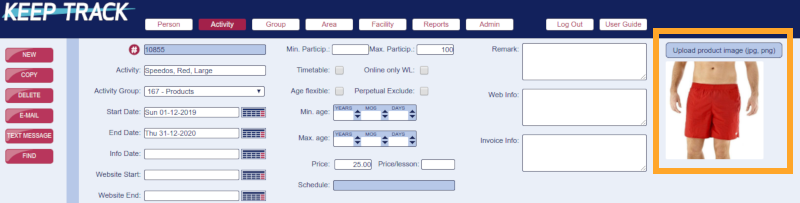
Fields explained top down
- Name of your product. Include size and color if applicable - Shown in your online booking
- Choose the group 'Products' that you registered in the previous step
- Insert start and end date (same date for both ie 31/12 of the year the product is "valid" - For your bookkeeping it's a good idea to register a new activity each year)
- Set 'Website end' to expose the product on your online booking
- 'Max Particip' is set to the number of products in stock. That way you don't risk selling what's not in stock (your wait list settings are still applicable here)
- Price including VAT
- 'Web info' is shown as additional information for this particular product.
- It's further advised to fill in the field 'Invoice info' with relevant information for the buyer, ie delivery/collection
- Upload product image - See own FAQ for details
If you want to note the facility on the product, for instance if it's a gym access card or the like, you simply register a lesson from 00:00-00:00 including the area on the activity. That will expose the facility on the product card online. In this case you might want to set the activity period (start and end date) to the actual period. Ie a month.
Online schedule
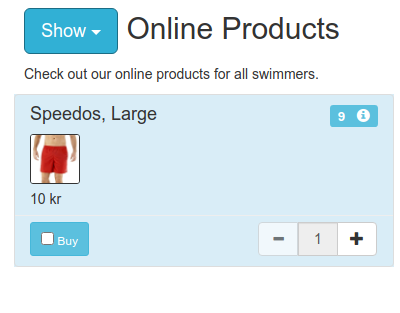
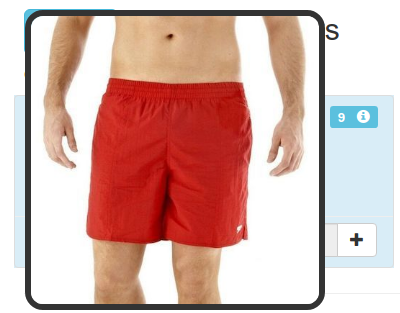
Uploading product images
Under 'Activity' you can upload one image for any activity but please note the following
- Only activities under a group marked 'Products' use the image outside the super-user GUI
- Activities under a group marked 'Products' will expose this image on your online booking
- Images < 12MB can be uploaded
- Images should be min 400x400px
- Images larger than 400x400px will automatically be scaled down and cropped from center to be exactly 400x400px
- Images smaller than 400x400px will automatically be scaled up and cropped from center to be exactly 400x400px
- Image files must be JPG or PNG
- Images will automatically be converted to JPG so you cannot use transparency
- Each activity can only have one image
- Images are shown under activity in 150x150px
- If you upload a new image it will replace the old image
- Overwritten images can not be retrieved

Original image 800x533px

Uploaded image automatically resized to 400x400px
Product images in your online booking
Read more here…
Contact Support to start the membership feature
If you want to add an annual or monthly fee for your members you will first have to order this at Support.
If you want discounts then you can include the 'membership group' in the regular automated discounts as they can be used here as well. Discounts are described in their own FAQ.
Once Support has initiated the feature you need the following setup
A dedicated membership group (Support will usually facilitate this and you never have to alter this again). This controls the automation, the header name and the VAT. Ticking the 'Administrative' box is optional and has no effect on membership.

Dedicated activities under the membership group to cover the periods you charge for. The start and end date (as marked) controls which activities are added membership fees (note that the fee can bee set to zero if you want the membership to be free).

- Mark all groups you want to incur the membership on in the field 'Req Membership'

Note
The automated sign-ups (and billing) begins on the start date you set in the membership activity. So if you set January 1st everybody is enrolled from that date.
The time span (start and end date) you set in the membership activity controls the addition of membership fee when a customer enrolls in an activity that's running within that time span - So it has nothing to do with when the customer signs up for an activity! Ie. You set the membership start date to 1/1 2019. A customer signing up for an activity running during December is not added to the 2019 membership. Another customer signing up for an activity running during January is added to the 2019 membership.
It's all automated
Once this is set up it runs automatically for both super-users and self-service via your online booking.
Before your customers can register for makeup lessons you have to register how this is controlled
You have to contact Support in order to get the feature 'turned on'
Next you follow the steps below to control which groups are open for makeups
- Go to 'Group'
- Find the group where cancellations entitle participants for makeups
- Mark the 'Make-up lessons' box (marked #1 in the image). Mandatory if you want to turn on makeups for this group
- If you want participants to be able to register makeups in any facility tick the box 'All facilities' (marked #2 in the image).
- - or select the facility (usually 'Same facility only')
- This can only be done by an ADMIN account! Under the lower menu item 'Make-up Groups' you now have to choose one or more corresponding groups under 'Make-up activity group' (marked #3 in the image) where the participants can register makeups (it's usually just the same group as the one where the cancellations entitle makeups). Note that this setting is mandatory if you want any makeup lessons to be open for participants.

That's it. You're now ready to inform your customers
Rules for makeups
Keep an eye out for changes as we will successively expand the possible settings.
- This feature is 100% customer self-service - There is no administration on your part
- Makeups can only be registered in the groups you have defined as shown under 'Make-up groups'
- Cancellations can only be done by the customer if the activities 'Timetable' is checked (if 'Timetable' is unchecked the activity will not show up under the customers 'My Bookings'.)
- Makeups can always be booked no matter the state of the activitys status of 'Timetable'
- Makeups can only be booked towards cancelled lessons and will therefor not block new paying customers from signing up for activities with free slots
- Lessons can be cancelled right up to the start time (you can set the number of hours - Contact us if so)
- Only Makeup lessons running at least 24 hours after the cancellation lesson can be booked (you can set the number of days/hours - Contact us if so)
- A cancelled lesson lives for 30 days after the lesson (you can set the number of days - Contact us if so)
- Within the time frame (30 days) you can even book makeups that are outside of this time frame
- Under group you have to set 'Same facility only' which means a cancellation only entitles a makeup in the same facility
- Makeups can only be booked if other participants have cancelled lessons on different activities within the same group
- If a customer is entitled to makeups in more than one group, available makeups will show and can be booked in any of these groups
- The check-box 'Ignore balance check' should not be ticked unless you are deliberately making dedicated makeup activities. See elsewhere
- Customers can only register makeup lessons as long as they are registered on a current or future activity. Once the customer stops, all makeups are lost (but they will pick up again if they register on an activity).
- Customers who are not registered on a current or future activity, but have already registered makeup lessons in the future, are still registered on these lessons.
- Note that membership, products, and administrative groups do not count as registered on a current or future activity.
Registered makeup lessons will turn up in your Star Tracker
Please note
The registration 'Start reg time' and 'End reg time' will of course affect the makeups. Any lesson outside of the customers registration start- and/or end-reg-time will not count towards elligible cancellations or makeups.

Please note the following on potential pitfalls
You will potentially encounter weird behavior if you do any of the following via the super-user interface which is why we recommend you do not do this
- An Administrator deletes a cancellation
- An Administrator changes the timeslot date/time
- An Administrator sets cancellations outside of the participants registration period
- An Administrator sets cancellations on a waitinglist
- An Administrator switches a registration to a waitinglist
Note that this can only be done by super-users and not by the participants.
Note that this will not break anything but mainly register more cancellations than the participant is actually entitled to.
Very long grace period warning
Your customer has a certain amount of time where a cancelled lesson is valid for a makeup. We call this the grace period. This period is usually 30 to 60 days. Please note that if you change the grace period to anything above this it will cause the below issues to a smaller or larger degree. This is a collection of feedback from companies with longer grace periods (from 90 to 365 days).
- You will have people taking makeups who are no longer customers (this is no longer possible as of October 2024)
- You will experience cases that are confusing for the customer (and for you).
- You will have people taking makeups on different levels because they leveled up during the grace period.
- You will initially see a huge increase in owed makeups (but not more available makeups to book).
- You will have more owed makeups but not more available slots for users to choose from.
- The above will in turn frustrate customers as they now have even more makeups that they cannot use.
- You will experience more customer contact regarding makeups
- Your attendance rate for makeups will likely be lower than today.
- And likely a range of other issues.
See how makeups work for your customers
Feel free to send this video to your customers for an easy way of promoting your app
Airport style timetable for your public places

Your timetable is a powerful tool to ensure your staff and customers always have direct access to on-going and up-coming activities live in your facility.
Once setup you can forget about the technical side as your timetable is always updated with the latest schedule right where you need it.

Content
- Time and date
- Instructor first name and image for ongoing lessons
- Ongoing lessons marked in yellow and coming lessons marked in blue
- For every lesson the following information is visible
- Start time
- Activity name
- Instructor first name
- Area name
- You can even have visual color codes for your areas
Good to know
- The Timetable only shows lessons if the activity is marked for 'Timetable'
- If the monitor looses Internet connection there will be a clear indication of this and the Timetable will pick-up when the connection is regained.
- The Timetable refreshes every 60 seconds on the minute
- The Timetable shows the upcoming 48 hours
- You can even show the Timetable on a vertical monitor if you have many lessons
- The Timetable can be viewed on virtually any device
You can use most of the standard web color names which can be found here https://html-color-codes.info/color-names/
Insert the color name under Group

Insert the color name under Area

Short visual teasers to download
For your convenience we have made some short and visual teasers you can download and either print to hand out or just e-mail to your staff or customers in order to promote the strong and mobile tools you have to offer.
Remember that you can simplify this further for your staff and customers by sending an e-mail with a direct link to the tool of your choice and all the user has to do is login.
'My Plan' for your staff
Download the PDF for 'My Plan'
'My Bookings' for your customers
Go to 'Facility' and click 'New' in the left menu.

The name and the GPS coordinate (shown in the red boxes) are mandatory but we highly recommend you also fill in information under 'Web Info' (information shown in your online booking) and 'Invoice Info' (general information shown in your invoices attachment) as shown in the orange box.
When you have entered all information you can move to 'Area' and register one or more areas for your new facility. You need areas in order to actually use your facilities ;)
In order to register a new facility you need to know the Lat/Long GPS coordinate for the location as this is mandatory (the coordinate ensures the facility is visible on the facility page in your online booking).
Go to https://www.latlong.net/convert-address-to-lat-long.html and follow these steps
- Enter the address of the facility
- Click 'Find'
- Copy the 'Lat Long' from below the map
- Insert the copied coordinate (55.613324,12.976362) into KeepTrack under 'Facility' 'Lat/Long'
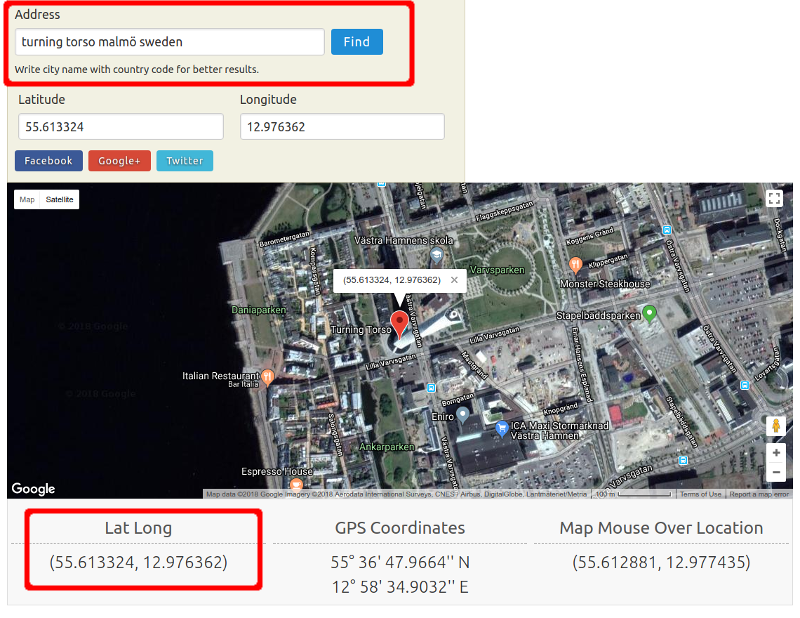
You will find your online booking on the address https://[company-name].app.keeptrack.dk where it's already live.
You can always use our test version for reference https://keeptrack.app.keeptrack.dk
What you have to do is this
- Register all the information needed for the setup
- Input all the information you need for facilities, groups and invoices
- Expose activities
- Place a link on your website or anywhere else you want it
Information for setup
Contact KeepTrack Support with the following information for setup
- High definition version of your company logo
- Mandatory fields on the user page https://keeptrack.app.keeptrack.dk/user both for the payer and for additional (children) profiles.
- Exposed information on the schedule page (number of available slots, number of lessons, instructor first name)
- Sender e-mail for invoices
- Recipient e-mail for the 'Contact Us' form
Information for facilities, groups and invoices
Input the following information in the super user interface
- Facilities web-info for exposure on the facility page (example: https://keeptrack.app.keeptrack.dk/facilities)
- Facilities invoice-info for exposure on the invoice attachments
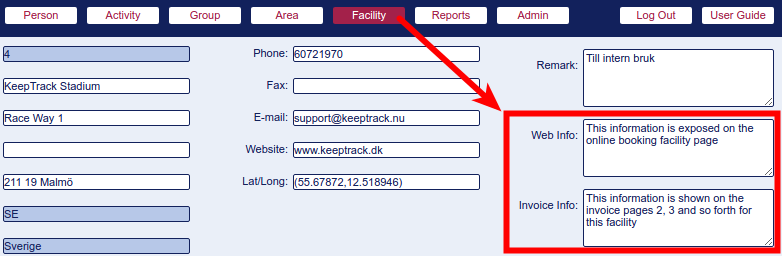
- Group web-info for exposure on the schedule page (below the group buttons)
- Group invoice-info for exposure on the invoice attachments

- You may even fill in web-info and/or invoice info for specific activities where necessary

'Standard' information you want all customers to recieve should go under Facilities invoice-info.
Expose activities
You expose activities by filling in at least the 'Website End' date (this shows the activity online and removes it again at the given date).
The activity is exposed during the entire 'Website End' date and will disappear at midnight after this date.
Fill in the 'Website Start' date if you want the activity to be hidden for now but automatically go online at a given date.
The activity is exposed during the entire 'Website Start' date and will appear at midnight before this date.
So in other words: The dates you enter will be included in the exposure period for that activity
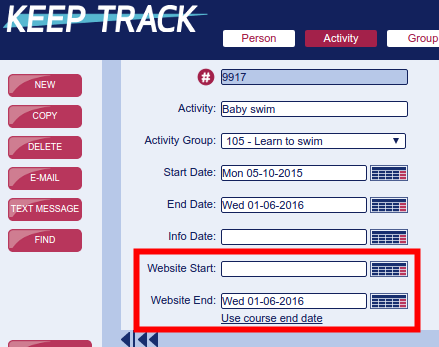
Place a link on your website
You give your customers access to your online booking by placing a link on your website, in an e-mail or anywhere else you like.
Connect these links to a button, image or a text link in order to send customers directly to the page specified. (Replace [company-name] with the name we have given your app which is usually some variation/abbreviation of your company name.)
- Front page https://[company-name].app.keeptrack.dk
- Login page https://[company-name].app.keeptrack.dk/login
- New profile/user page https://[company-name].app.keeptrack.dk/user
- Facility page https://[company-name].app.keeptrack.dk/facilities
- Schedule https://[company-name].app.keeptrack.dk/schedule
- Schedule for specific facilitie(s) https://[company-name].app.keeptrack.dk/schedule?facility_no[]=1&facility_no[]=4
where '1' and '4' in this example is the ID/number of the facility as noted in the super-user interface. - Schedule with a specific group open and in focus https://[company-name].app.keeptrack.dk/schedule#course-group-13
where '13' is the ID/number of the group as noted in the super-user interface.
A text, button or image link should contain at least this code:
<a href="https://[company-name].app.keeptrack.dk" target="_blank">(Image or text)</a>
Keys with global functions
Enter will force a save of your work to the server.
Hit the Esc key once or twice to undo what you have done in the form field you have in focus.
Tab moves focus to the next form field.
Shift+Tab moves focus backwards in the form fields.
Date fields
If you write "now" in a date field, todays date will automatically be added.
Deleting entire records or other information
Overall you can only delete records according to your account privileges and even then you will be presented with a warning before deletion.
The accounts 'guest' and 'staff' cannot delete entire records only information in certain fields.
Changing data
You can change data directly in the form fields. Even in sub menues, search pages and so on.
Saving changed and new data
Press Enter or switch to a new field (in sub menues) or a new record (in main windows).
Mandatory fields and syntax
Some fields are mandatory to fill in and some fields have a mandatory syntax for the content (ie time is registered 'hh:mm' like '10:30'). If you do not meet these criteria you will get an error message.
Please contact support for opening, changing or closing super-user accounts and passwords. Just send an e-mail from an administrator with information on who the account is for (the persons ID in KeepTrack) and what rights you need.
You have several different user accounts with different levels of rights to choose from. Below are all accounts listed from highest to lowest level of access.
Note that there ATOW is a difference between super-user accounts and Dashboard accounts. Here you need two different login accounts.
- Admin - Has all rights.
- Audit - Can see financial reports in the Dashboard.
- Trust_hr - Has the same rights as 'Trust' plus all HR-data.
- Trust - Has access to everything except database administration, financial key figures, HR-qualifications, and certain financial reports.
- Staff_payment - Has the same rights as 'Staff' plus can register new payments (not alter or delete payments).
- Staff - Can see 'Person', 'Activity', and the Dashboard, cannot delete anything, can register new customers, sign customers up for activities, register correspondence, qualifications and attendance, can change customers data except payments and can handle some reports.
- Guest - Can only read data. Can read the same data as the 'staff' account.

- Register the employee under 'Person' and tick 'Employee'. Now this person will show up as an instructor on courses and every employee related report, schedules and the like.
- Fill in unique 'Initials' (these are important as they are also used for super-user accounts).
- In 'Person' 'Qualifications' it is possible to enter what we call "HR-qualifications". These are only viewable and writable by user accounts with 'Admin' or 'HR' rights.
- In a new database you might not see the HR-qualifications you need. In that case you just make a list under 'Admin' 'Qualification' - Remember to set 'R/W Rights' to "Admin, HR".
- A few suggestions for the list:
- Contract
- Employee handbook distributed
- Monthly salary
- Paid by the hour
- Salary comment
- Wage supplements, pension
- Internal training (you might want to specify on individual lines)
- External education
- Workshops
- Substitute
- Supervisor
Pro Tip
When you insert your HR qualifications you can set an Asterisk '*' in front of the name (see example in the image below). That way you can easily distinguish between HR and customer qualifications in your everyday work.

Go to and click  or
or 

Enter information
- ID No. is automatically filled in and cannot be changed
- "Activity Group" is the group name - This is the only mandatory field
- "VAT" is the VAT rate for all activities in this group. Even if you are VAT exempt we recommend you choose 0% instead of leaving the field empty
- "Color" is a web color of your choice and can be used in graphical reports and the like. Use HTML colors (aqua, fuchsia, gray, green, lime, maroon, olive, orange, purple, silver, teal, white, yellow...) but please be aware that 'red' is a reserved system color and that we advise you do not choose dark colors (like black, navy and the like) as this obscures the text
- "Header" controls the separation of activities in your online booking. Leave blank if you do not use it
- "Make-up lessons" activates your make-ups on all activities in this group. "All facilities" and "this facility" are used for controlling the make-up behavior
- "Age flexible" breaks the age limit so any age can register. Our recommendations are that you do not use this field but instead just leave the next two fields empty
- "Min. age" controls registrations on all activities in this group. Persons registering must meet this minimum age which is calculated based on the age at the activity start date. Leave it empty if you have no minimum age. Please note that if you set this customers who sign up must have birth-date registered
- "Max. age" controls registrations on all activities in this group. Persons registering must be younger than this maximum age which is calculated based on the age at the activity start date. Leave it empty if you have no age limit. Please note that if you set this customers who sign up must have birth-date registered
- "Req Membership" is only used if there is a mandatory membership or membership fee in connection with bookings in this group (contact support if you want to implement automated membership)
- "Administrative" is for internal activities like front desk scheduling where there are no participants. Activities in this group are then removed from the 'Find course' where you sign up customers
- "Product" is for selling products and alters the way these 'activities' are shown both in the online booking and in reports
- "Discount late reg" sets your online booking with a discount if participants sign up after the first of multiple lessons has passed. The discount is set based on the number of lessons missed in comparison with the total number of lessons on the activity (eg you miss 2 out of 10 lessons and get 20% discount)
- "Perpetual" activates the perpetual automation for all activities in this group
- "DD Auto" controls direct debit (USA) or AutoGiro (Sweden). Do not set this unless you are actively using this feature
- "Remark" is for internal comments
- "Web Info" is for comments on your online booking schedule. We recommend you use this field
- "Invoice Info" is for comments/information on your invoices. We recommend you use this field
Click  (or 'Cancel' if you don't want to create the group).
Go to 'Admin' 'Qualification' to make new or alter existing qualifications
First go to  to register all necessary qualifications before you can set these under 'Group'! Please note that it is important to set the 'R/W Rights' correctly for this to work!!
- Empty field in 'R/W Rights' = Visible for Customers, Star Tracker and all super-users
- 'Attendance' in 'R/W Rights' = Visible for Star Tracker and all super-users
- 'Staff' in 'R/W Rights' = Visible for super-users
- Use account groups with higher rights level ('Admin', 'HR') for HR qualifications or the like

- If you want to sort the qualifications in a certain order you insert a leading number in the qualification name (Ex.: '01 The first qualification', '02 The next qualification')
- Text inserted under 'Remark' will show up after the qualification name under 'Person' and 'Group' and in the Star Tracker when you click the 'Edit' button on participants.
Go to 'Group' 'Qualification'

Under 'Group' you will find 'Qualification' which is where you control these for all your activities.
When you make the list containing all your qualifications for all your groups there are a few things you should notice.
- You can run your business without setting these.
- If you choose to implement this powerful tool you have two sets of qualifications: Prerequisites are mandatory to sign up for this level and Proficiencies are skills you acquire on this level.
- If you set prerequisites for a group you must set the same qualifications as proficiencies for the preceding group on the lower level.
- We highly recommend to set just one prerequisite per group/level along with the corresponding proficiency. Ie on level 4 you set 'Ready for level 4' as a prerequisite and on level 3 you set 'Ready for level 4' as a proficiency. That way only participants in level 3 with this "skill" can enroll to level 4. (Please note that you technically can use multiple prerequisites on one group/level but apart from complicating things unnecessarily you will also experience unwanted handling in different tools like the Star Tracker.)
This feature interacts with your online booking and with your Star Tracker. This is described elsewhere.
The chart below shows that with the written settings participants can only book according to the green arrows. New participants (without qualifications) cannot book anything but level 1 or 2 (please note that even the age span is controlling who can register).

How to handle VAT
Under 'Admin' 'VAT' you can insert new VAT rates or alter existing ones.
- The 'VAT' field is the text shown in the invoice and more
- The 'VAT rate (%)' field is the actual mathematical rate used for all calculations
- The 'Remark' field is for your convenience

Please note that VAT is always included in the price. You set the total price under 'Activity' and the invoice will handle the exposure of the VAT.
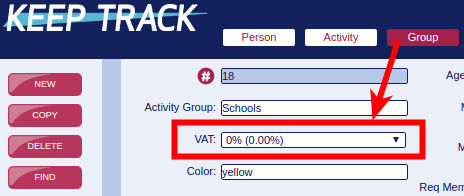
Once the VAT rates are in place you can set them under 'Group' where all activities under this group will have this VAT rate included.
Even though your business/product is VAT exempt we recommend you set the VAT rate explicitly at 0% instead of leaving the field blank. This shows your customers, accountant and other people what the rate is and thus avoids possible confusion.
The automated direct debit feature is until further notice only implemented in the US in the Authorize.net/FattMerchant solution

The direct debit run can be handled in different ways but when these criteria are met the person is charged
- Credit card on file
- Outstanding balance on one or more invoices
- Due date is passed
Furthermore the direct debit procedure can be set to run fully automated one or more times a month. The transaction will be run in real time in a few seconds on the desired day of the month. All payments are automatically registered on the invoice as soon as the payment is confirmed.
Technical Stuff
Information and answers to technical and legal questions
After 2018-05-25 it's mandatory for companies with customers within the EU to comply with the General Data Protection Regulation (GDPR)
It is up to the company who is data responsible (you) to document compliance but as a service to you as a customer we have chosen to present you with the following assistance
- A contract that documents your compliance when using KeepTrack services
- Changes to our services in order to ensure compliance
- A short list of headlines and bullet points to get you started on your own work with the GDPR
The only change you will see in our services is the Terms of Sale (TOS) will be more visible to your customers as they have to actively comply to these. It's in your own interest you see to it that your TOS are fully updated prior to May 25th. Just send the updated version to Support and they'll update them in your online booking.
What is this GDPR all about?
The GDPR is all about securing some form of privacy for you and me and that puts some restraints on what and how companies can handle our data. Here you get four main areas in bullet form and then it's up to you to take over from therre.
Primary questions and user rights
- Is the data relevant for the business? If answer 'No' then you cannot harvest/store them!
- Do you really need the data? If answer 'No' then you cannot harvest/store them!
- What's the time frame for storing the data?
- What's the 'Death Date' for the data? And how will you ensure destruction when they are no longer needed?
- The user might have to actively give consent (see below) - Even for public data
- The user owns the data and has a right to access it. In practical terms this means a user can ask for the data and you have to deliver this in an easily readable way.
- The user has a 'right to be forgotten'. That means destruction or anonymization of data upon request. Note that this can be overridden by other regulations like tax and bookkeeping (see below).
Legal grounds for lawful processing of data
Companies are often confused about this part and thereby seeks consent which is only one of six legal grounds for data processing - And the least attractive for the company (and sometimes even for the customer).
So let us establish a fact
You do NOT need consent if you fall under ANY of the other 5 legal grounds!
These are the 6 legal grounds ordered by relevance for the vast majority of our users
- Contractual necessity
- Legal obligations
- Legitimate interests
- Consent (usually only for unrelated marketing and in these cases only for sending and not for the actual data processed under one of the above grounds)
- Public interests (not relevant)
- Vital interests (not relevant)
Please find more detailed information elsewhere
What data are we talking about?
For most companies the GDPR is talking about two kinds of data: 'Personal' and 'Special'. If you can stick to 'Personal' data it will ease your work on preparing for the GDPR.
Usually companies have data collection on customers and staff but be sure you have included all possibilities. Also note that as a rule of thumb all health data is considered special and for instance registering a membership of a union on a staff member is considered special data.
Here follows examples of what should be Personal data (note where marked with * it can be both) and that this doesn't consider compliance to other regulations!
- Sex
- Name
- Address
- Birthday
- IP4 address
- Phone
- Credit card
- Bank account
- Family relations
- Notes
- Profile image
- Contact persons
- Absence/attendance
- Contract*
- Tax information*
- Employee Development Program*
Where do you store/use data?
The fewer places you store data the easier to keep it under control
- Paper
- PC's/LapTop's
- In-house servers
- Dropbox and other cloud storage
- Google Drive
- Smart phones
- Third party with access control
- Third party without access control
- Website
Who is handling your data?
Make a list of everybody with access to your data
- Management
- Trusted staff
- Staff
- Public
- Others?
- Data owner him-/herself
- Third parties
- Salary
- Bookkeeping
- Auditing
- Payments
- CRM
- External IT
- Internal IT
DISCLAIMER
This article comes with absolutely no guarantee it's either correct or complete or in any way related to your business.
Always seek professional legal assistance on this topic.
![]()
Not us!
Many years ago, we chose not to track end users and thus also not bother them with cookie prompts or other permissions and messages that obstruct signups, bookings and access to their accounts.
Therefore, unfortunately, we cannot set META pixel, Google analytics or other tracking on the online booking.
Across our customers' online booking we have 89-96% satisfied and very satisfied end users. This number has been consistent through the years.
Merchant service provider and possible acquirers
You need an account at a merchant service provider (in Europe we only support QuickPay) and possibly an acquirer for handling your credit cards and other online transactions. KeepTrack Support will set this up for you and implement the solution directly in your online booking app.
The service provider integrated in KeepTrack is QuickPay. You sign up via KeepTrack Support.
The pricing is simple and can be found at https://quickpay.net/
QuickPay handles the following payment methods without any other accounts.


You can further implement these payment methods
These come with extra fees and agreements with additional acquirers. See QuickPay for pricing and terms.
- MobilePay Online
- Dankort
- JCB, Diners, Amex
- Anyday
- PayPal
- ViaBill
- Klarna
- Trustly
- iDEAL
- Paysafecard
Outside of QuickPay we even support SEPA and AutoGiro direct debit payments. Contact our support to know more.
Handling your money
You have your own merchant service account with us and all financial transactions are handled directly between you and the service providers. KeepTrack GmbH has no handling of your money transactions - Only the information regarding payments (who has paid, when, and how much).
The costs for QuickPay and other acquirers are not included in your KeepTrack service.
(If you sign up directly at QuickPay, there is an additional KeepTrack fee of €19 per month for this service. This covers KeepTrack for all running services under QuickPay but does not cover possible setup costs.)
Please note the following
- All payments are registered in real time directly in your KeepTrack service
- Note our Dashboard tool for handling rejected payments. See own FAQ
Authorize.net for the US market
For US customers we have integration to Authorize.net via Stax where we have very competitive agreements for you as a merchant.
Contact Support if you wish to implement Authorize.net in your online booking
Front page of your online booking
Add a text, button or image link containing at least this code:
<a href="https://[company-name].app.keeptrack.dk" target="_blank">(Image or text)</a>
Where [company-name] is the company name as given by KeepTrack.
The easiest way to get the correct links is to go to the desired page on your online booking and simply copy the link.
Login page of your online booking
<a href="https://[company-name].app.keeptrack.dk/login" target="_blank">(Image or text)</a>
Register/user page of your online booking
<a href="https://[company-name].app.keeptrack.dk/user" target="_blank">(Image or text)</a>
Your facilities
Add a text, button or image link on your website where you want access to the facility page with a map.
<a href="https://[company-name].app.keeptrack.dk/facilities" target="_blank">(text or image)</a>
Your schedule
KeepTrack handles your online schedule as well as your online registration as that will maximize your uptime and minimize errors.
<a href="https://[company-name].app.keeptrack.dk/schedule" target="_blank">(text or image)</a>
Schedule for specified facilities
Here shown for facility no. 4
<a href="https://[company-name].app.keeptrack.dk/schedule?facility_no[]=4" target="_blank">(text or image)</a>
Here shown for facility no. 1 and 4
<a href="https://[company-name].app.keeptrack.dk/schedule?facility_no[]=1&facility_no[]=4" target="_blank">(text or image)</a>
Schedule with a specific group open and in focus
Here shown for group no. '13'
<a https://[company-name].app.keeptrack.dk/schedule#course-group-13 target="_blank">(text or image)</a>
Schedule for specified facility and with a specific group open and in focus
Here shown for facility no. '1' and group no. '13'
<a https://[company-name].app.keeptrack.dk/schedule?facility_no[]=1#course-group-13 target="_blank">(text or image)</a>
'My Bookings'
This will prompt the user for login credentials and send her directly to 'My Bookings'
<a href="https://[company-name].app.keeptrack.dk/user/bookings" target="_blank">(text or image)</a>
'My Payment Options'
This will prompt the user for login credentials and send her directly to 'My Payment Options'
<a href="https://[company-name].app.keeptrack.dk/user/payment/options" target="_blank">(text or image)</a>
'My Plan' (staff only)
This will prompt the employee for login credentials and send her directly to 'My Plan'
<a href="https://[company-name].app.keeptrack.dk/staff/instructor/schedule" target="_blank">(text or image)</a>
Your 'Timetable' is showing ongoing lessons live, it's automated and once it's setup it just runs 24/7. It must be ordered at Support.
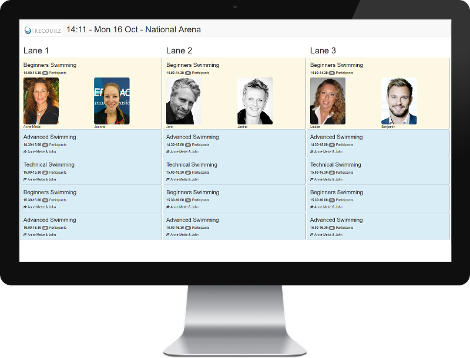
Timetable for facility
Your timetable is located at https://(database name).app.keeptrack.dk/timetable/(Facility no.) (Eg. https://keeptrack.app.keeptrack.dk/timetable/1) This displays all the lessons in the listed facility for the coming 48 hours.
Suggested hardware
In order to utilize your timetable in the best way possible we suggest you use as big a monitor as you can afford. Furthermore you want the system to be automated and stable which is why we recommend some form of Linux box. The cheapest is to buy a small Chromebook/Chromebox. Both suggestions below will start up your system directly in full screen timetable without login or any other use of a HID like mouse or keyboard.
Or see this professional solution https://enterprise.google.com/chrome/digital-signage/
Setting up an automated Linux box
Use a small Linux box with a browser and Internet connection. The timetable (browser) takes very few resources. For stability reasons it's preferred to use a cabled Internet connection over WiFi.
Make sure you use an account with auto-login in order to automate restarts.
Open 'Startup Applications' in Ubuntu or the equivalent in other distros. Insert the following line where the web address is formatted like abovegoogle-chrome --kiosk --incognito --new-window https://(database name).app.keeptrack.dk/timetable/(Facility no.)
Setting up an automated Chromebook
Since you are trying to setup the Kiosk App to auto launch, you must first put the Chromebook into Kiosk mode. Set it up as follows.
We prefer the 'Kiosk' app
- Wipe Data on Chromebook (https://support.google.com/chrome/a/answer/1360642?hl=en
) - After wipe is completed, you will be at the welcome screen. (Input your network information, but DO NOT LOGIN to the Chromebook)
- At the login screen, press CTRL+ALT+K and enable Kiosk mode.
- Login into the Chromebook
- Open a new tab in Chrome, and enter chrome://extensions in the address bar (also known as the omnibox). Click enter.
- Check the box next to Developer Mode.
- Click Add kiosk application, and enter the ID of the Kiosk App you'd like to enable.
- Highlight the Kiosk App and select "auto launch"
- Press Enter or click Done.
- If you want to change the rotation of the monitor (ie running in vertical mode) do it now through display settings under Chrome OS. The rotation you choose will stick on reboots.
- Reboot and when asked, enable app for Kiosk mode
- Insert the desired URL and other settings (remember the username and password you choose ;)
- Now the app will auto launch each time you reboot.
Exit to kiosk admin
In order to get back to the kiosk admin interface press Ctrl+a
To Turn off Kiosk Mode
Begin by rebooting the Chromebook. While the device is starting up, press the keyboard shortcut Ctrl+Alt+S to interrupt the process and return to the login screen/Chrome OS.
Mandatory settings
- PNG Format (if you have jpg images just rename the suffix to 'png')
- Size 200x200px exactly
- Naming convention: [instructorID].png
- Black and white images
To avoid e-mail clients messing up the images please send in ZIP-file
Making the images
In any photo editing software first crop and resize your images to the exact size 200x200px (200px wide, 200px high), change the mode to grayscale and save it in the 'PNG' or 'JPG' format.
The name of the file must be exactly "instructorID.png" (note the 'png' suffix even if you have jpg format!) where "instructorID" is the instructor number from your KeepTrack database in digits (ie "17502"). 'png' is written in lowercase letters (ie 17502.png).
Send these images to KeepTrack Support compressed in a zip-file and we will facilitate the upload.
If you want to show a default image (placeholder) when there is no image for the instructor you can make a generic image like described but with the exact file name "photo.png".
Formatting the images according to the above settings can be done by a skilled person in a matter of seconds for each image. If you don't know how to do this we recommend you hire a pro to get the best results.
Examples


Mandatory settings for Timetable images
- PNG Format (if you have jpg images just rename the suffix to 'png')
- Size 100x100px exactly
- Naming convention: [groupID].png
To avoid e-mail clients messing up the images please send in ZIP-file
Making the images
In any photo editing software first crop and resize your images to the exact size 100x100px (100px wide, 100px high) and save it in the 'PNG' or 'JPG' format.
The name of the file must be exactly "groupID.png" (note the 'png' suffix even if you have jpg format!) where "groupID" is the group number from your KeepTrack database in digits (ie "102"). 'png' is written in lowercase letters (ie 102.png).
Send these images to KeepTrack Support compressed in a zip-file and we will facilitate the upload.
Formatting the images according to the above settings can be done by a skilled person in a matter of seconds for each image. If you don't know how to do this we recommend you hire a pro to get the best results.
Example

Group images for invoice attachments. Please note the following
- Images on groups will be exposed in your invoices
- Images < 12MB can be uploaded
- Images should be min 400x400px
- Images larger than 400x400px will automatically be scaled down and cropped from center to be exactly 400x400px
- Images smaller than 400x400px will automatically be scaled up and cropped from center to be exactly 400x400px
- Image files must be JPG or PNG
- Images will automatically be converted to JPG so you cannot use transparency
- Each group can only have one image
- Images are shown under group in 150x150px
- If you upload a new image it will replace the old image
- Overwritten images can not be retrieved
Uploading the images
Log in to your super-user account and go to 'Group' where you can upload your image under the relevant group.
Uploading a new image will overwrite the existing image.
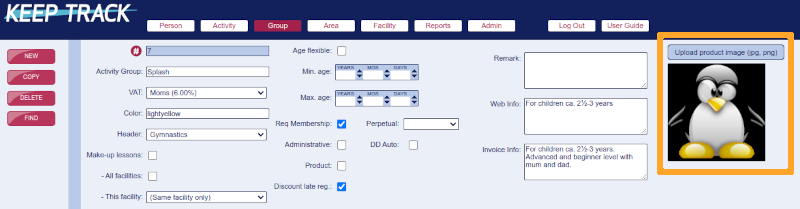
Example
Original image 800x533px
Uploaded image automatically resized to 400x400px
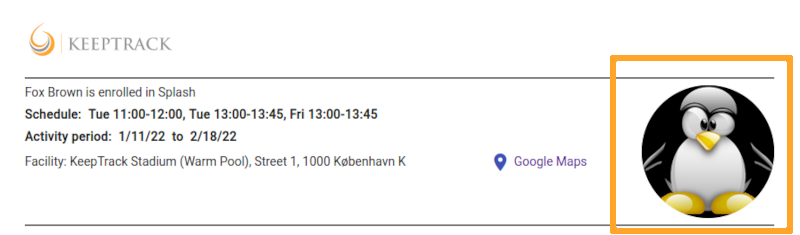
Image on the invoice attachment
Quick test with mail/domain-tester
Follow the steps here https://www.mail-tester.com
https://dmarcian.com/
Set up your own domain
It can be a problem to send mail from a different mail server than 'your own'. The reason for this is that the world is trying to fight the ridiculous amount of spam that floods us in general and one of the weapons in this quest is called "TXT record" which basically means that the owner of a domain (www.example.com) will register which servers are authorized to send out mail for that domain. By experience we have seen that it is mainly hotmail, outlook and live.com (Microsoft) who reject mails from unauthorized servers but others are following.
This means that if example.com wants to send out mail via for instance a service for news mails, via a financial program and via KeepTrack you have to register all these servers with a DNS TXT under your own domain.
You can follow this link http://www.spfwizard.net/
If you only send mail via MX the spf part of your DNS TXT should look like this: v=spf1 mx a include:_spf.keeptrack.dk ~all
Test spf settings http://www.kitterman.com/spf/validate.html
Add this CNAME record to your domain DNS to register DKIM: 'ktsrv._domainkey.[YOUR_DOMAIN]' IN CNAME 'ktsrv._domainkey.keeptrack.dk'
Add this TXT record to your domain DNS to register DMARC: '_dmarc' IN TXT 'v=DMARC1; p=reject' (alternatively you can use 'p=quarantine')
Check your domains DNS settings https://dnschecker.org/all-dns-records-of-domain.php
Check your spam status https://www.spamhaus.org/lookup
If you do not understand the above we strongly recommend that you seek assistance from an expert consultant.
Particularly for Microsoft mails (Hotmail, Live, Outlook...)
Apart from the above settings Microsoft has its own service where you should register KeepTrack as an approved sender of your e-mail.
- Go to the website https://sender.office.com/
- Enter the e-mail(s) you use as a sender in KeepTrack
- Enter IP 83.221.131.67
- and follow the guides on the page and in the subsequent e-mail you get from Microsoft
If you are anyway in doubt whether you have registered just go to the website again and enter the same data. Microsoft will then tell you whether or not you are already registered.
If the OCR code is '009368301004596' you will find the following information
- 009368301004596 = First seven digits: The payer ID number (93683)
- 009368301004596 = Next seven digits: The registration number (100459)
- 009368301004596 = Last digit: The modulus 10 check digit (6) ensuring payers enter the correct OCR

You find this under 'Admin' 'Payment'
The following file types are available
- SEPA Direct Debit - EU
- FIK 71 & 75 - Denmark
- BankGirot - Sweden
- BGMax (Deprecated by the banks as of 2023-01-01. Replaced by ISO 20022) - Sweden
- Camt.054 Credit (ISO 20022) - Sweden
- AutoGiro - Sweden
- OCR Giro - Sweden
- MT-940 CSV - Germany
Have your file ready
- Choose the correct input format
- Upload the file from your computer
- Submit payments
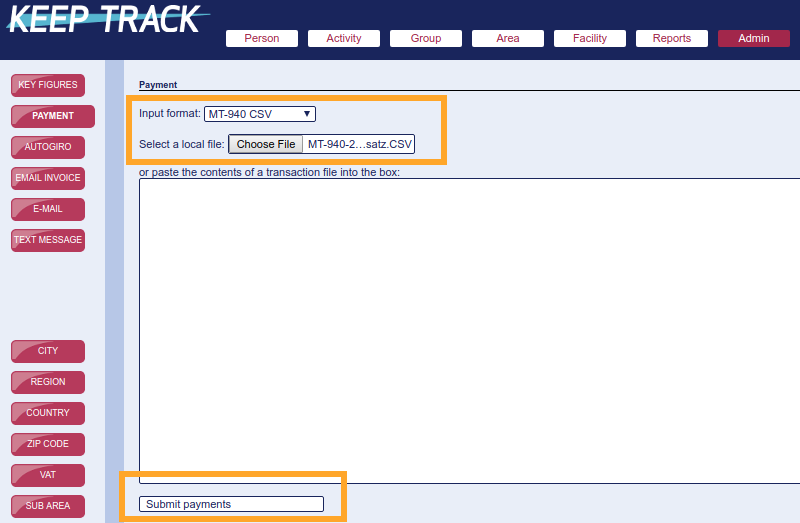
Confirmation
You will get a confirmation telling you the status of the transactions
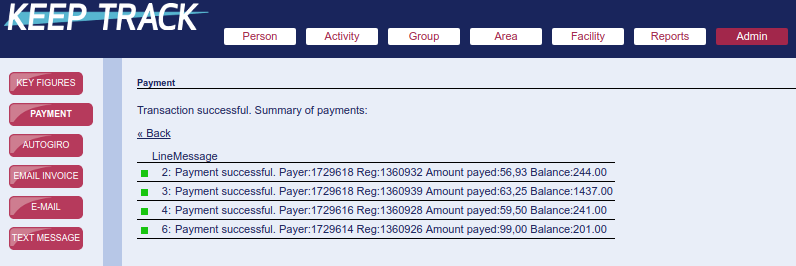
Errors
If there are one or more errors those payments will be marked with red dots accordingly. The errors below are due to the user trying to upload the same file a second time.
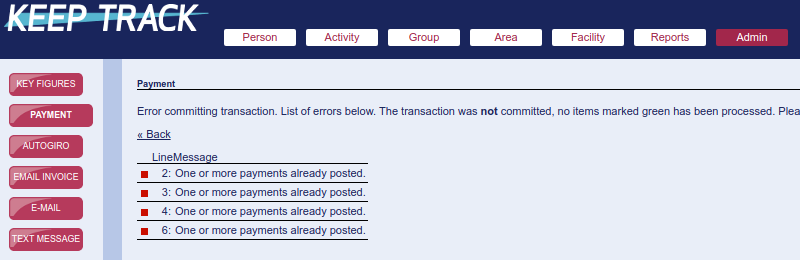
CAUTION: Errors in 'MT-940 CSV' files
Due to the technical nature of the 'MT-940 CSV' files, errors will unfortunately not be indicated with red. In this case you have to "find" the missing row numbers. Ie see the example above where rows 2, 3, 4 and 6 are successful. This means that row 5 and possibly everything after row 6 is not registered!
In this case you have to open the original file in a text editor and manually inspect the missing rows and register these accordingly via 'Person' 'Payments'.
ISO 20022 XML pain.008.001.02 (and pain.008.003.02 format)
In order to use this you have to contact KeepTrack Support with information from your bank where we need the following:
- Company name on the contract
- Contract ID No.
- Contract IBAN No. for receiving payments
- Contract BIC/SWIFT No. (11 characters)
Via the Dashboard https://keeptrack.dk/db under 'Exports' you will find the report for downloading your SEPA XML-file which can since be used for import to your bank and for registering the payments contained in the file in KeepTrack.

The only input you need is the required collection date (the date the amount is paid from the customer account). The output will contain all DD invoices with outstanding balance. Please note that this date must be in the future!
If you want to limit the output up till a certain due date you enter this date in the 'Payment date limit' field. The output will contain all DD invoices with outstanding balance and with a due date before this date.
Registering payments is done via . When you import the file and register the payments the payment date is set to the date you are importing the file (and not to the collection date).
What does the file include
All of the below points must be met in order to include the payment!
- The SEPA setup must be registered in your SETTINGS (initially done by Support). See the point at the top of the page
- The payer needs the qualification 'IBAN'
- The payers qualification 'IBAN' needs to have the payers full IBAN No. in the remark field
- Invoices with outstanding balance and with 'Due Date' before the chosen 'Payment date limit'.
One payer can have multiple invoices included in the same file
Important points
The exported file is XML but can be handled as text by opening the file in a basic text editor or renaming the file ending '.xml' to '.txt'
Make sure you set your collection date the same or further out than your 'Payment date limit' if you only want to collect from customers where due date is past.
It's very important that after you export the file and send it to the bank you register all contained payments before you pull the next file or else you will risk charging customers double.
To improve the efficiency of your staff on deck you have the choice to implement the Star Tracker where your staff can perform most of their daily tasks.
We have two specific recommendations - One economic but efficient solution and one perfect solution. Overall we recommend a 7" version of any tablet as this can handle all tasks and is not as prone to dropping due to better grip.
Economic and efficient - Standard Android 7"

For a price as low as $120-170 (2022) you get a super efficient tool at a cost that will not ruin you even if it breaks (or gets stolen). We have better experience with the brands ASUS, Lenovo and Dell and over-all we recommend you to stear clear of 'no-name' brands. You can further improve ruggedness by using a waterproof cover.
The perfect tool - Samsung Tab Active3 8"

If you want the best tool for the job you pay the $490 (spring 2022) and get a tablet that easily handles the wet environment, dropping and anything else you throw at it.
https://www.samsung.com/us/business/mobile/tablets/galaxy-tab-active/
You can of course use any size or brand, iPad or tablet, you prefer.
Yes we do
You can use these to jump from an external system and directly to the person/activity in your super-user account (you need to login of course). You furthermore find these links implemented directly in your Dashboard.
Person: https://keeptrack.dk/index.php?pg=person&no= plus the person number. Ie. https://keeptrack.dk/index.php?pg=person&no=12345 brings you directly to person 12345.
Activity: https://keeptrack.dk/index.php?pg=course&no= plus the activity number. Ie. https://keeptrack.dk/index.php?pg=course&no=67890 brings you directly to activity 67890.